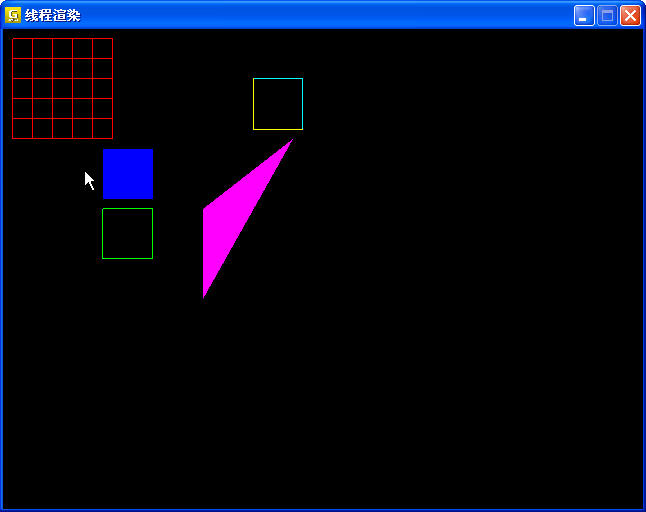
使用蓋莫游戲引擎在線程中渲染的簡單例子
繪制簡單的幾何體小例子
比較簡單
代碼如下:
1 #include <GEngine/GaiMo.hpp>
2
3 core::Color color1(0.0f,0.0f,1.0f),color2(0.0f,1.0f,0.0f);
4 core::Color color3(1.0f,0.0f,0.0f),color4(1.0f,0.0f,1.0f);
5 core::Color color5(1.0f,1.0f,0.0f),color6(0.0f,1.0f,1.0f);
6
7 core::Device *device = NULL;
8
9 ThreadId id = 0;
10 bool flag = true;
11
12 void G_CALL Render(void* ptr)
13 {
14 device->AttachRender();
15 do
16 {
17 BEGIN_LOOP(device)
18 //! 繪制矩形
19 core::Render::SetCurrentColor(color1);
20 core::Render::FillRect(100,120,50,50);
21 //! 繪制矩形
22 core::Render::SetCurrentColor(color2);
23 core::Render::DrawRect(100,180,50,50);
24 //! 繪制網格
25 core::Render::SetCurrentColor(color3);
26 core::Render::DrawGrid(Point(10,10),Point(20,20),Point(5,5));
27 //! 繪制變色矩形
28 core::Render::DrawRaisedRectangle(libmath::Rect<float>(250,50,50,50),color5,color6);
29 //! 繪制三角形
30 core::Render::SetCurrentColor(color4);
31 core::Render::DrawTriangle(Point(200,180),Point(200,270),Point(290,110),true);
32 END_LOOP(device);
33 }while(flag);
34 }
35
36 int Main()
37 {
38 device = core::InitDevice("線程渲染");
39 device->Ortho2D();
40 device->DetachRender();
41 id = device->CreateThread(Render,NULL);
42 BEGIN_LOOP(device)
43 if(device->GetInput()->IsPressedKey(KEY_BACKSPACE) == true)
44 flag = false;
45 END_LOOP(device)
46
47 device->Close();
48 device->Drop();
49
50 return 1;
51 }
52
貼圖為:
說明使用線程渲染是先斷開opengl上下文
然后在線程中再勾住opengl上下文
然后其他操作就一般化了
摘要: 本例子源于ode自帶的例子:demo_chain2演示的是一個由小盒子構成的鏈子在受正弦力左右下的物理現象(當然還有重力因素).其代碼如下:
1 //! 2010.03.03 2 ///////////////////////////////////////////////////// 3 ...
閱讀全文
摘要: 當前引擎只是簡單的封裝了ode幾個函數而已更多的工作需要以后慢慢加入之這個demo的含義是物理對象在物理場景中會是到重力的作用,如果沒有支持物的話會向下掉下面這是實現的代碼-為了貼圖我把重力加速度設置的很小(-0.0098f)
1 //! 2010.03.03 2 ////////////////////////////...
閱讀全文
這不是正式測試的demo例子
其存在的必要是為物理引擎Demo做準備的O(∩_∩)O~
1 //! 2010.03.03
2 /////////////////////////////////////////////////////
3 /// 蓋莫游戲引擎的立方體繪制
4 /////////////////////////////////////////////////////
5 //! 測試立方體繪制函數,矩陣,輸入輸出
6 //! 按鍵f1,f2,f3旋轉立方體
7 #include <GEngine/Gaimo.hpp>
8 using namespace std;
9
10 Matrix4f mat;
11
12 //! 處理鼠標響應
13 void MouseCheck(core::Input* input);
14
15 int main(int argc, char **argv)
16 {
17 //! 初始化引擎設備并得到設備指針
18 core::Device* device = core::InitDevice("蓋莫引擎立方體測試");
19 //! 得到引擎場景指針
20 core::RefPtr<core::SceneManager> scenemanager = device->GetSceneManager();
21 //! 得到引擎資源指針
22 core::ResourceManager* resourcemanager = device->GetResourceManager();
23
24 //! 獲取lua指針
25 LuaPlus::LuaStateOwner *lua = device->GetLuaStateOwner();
26
27 //! 得到logo圖形和其紋理
28 core::RefPtr<core::Image> logo = resourcemanager->GetImage("logo","..\\image//logo.jpg");
29 core::RefPtr<core::Texture> logotexture = resourcemanager->GetTexture("logo",logo);
30 logotexture->Bind();
31
32 //! 獲取全局攝像機
33 core::RefPtr<core::Camera> camera = scenemanager->GetGlobalCamera(Vector3f(30,30,30),
34 Vector3f(0,0,0),
35 Vector3f(0,1,0));
36 camera->SetViewport(0,0,640,480);
37 camera->SetPerspective(50.0f,640.0f/480.0f,0.1f,1000.0f);
38 glClearDepth(1.0f);
39 glDepthFunc(GL_LEQUAL);
40 glEnable(GL_DEPTH_TEST);
41 glEnable(GL_CULL_FACE);
42 glShadeModel(GL_SMOOTH);
43 glHint(GL_PERSPECTIVE_CORRECTION_HINT, GL_NICEST);
44
45 float sides[] = {16,16,16};
46 float pos[] = {0,0,0};
47
48 BEGIN_LOOP(device)
49 glClear(GL_COLOR_BUFFER_BIT | GL_DEPTH_BUFFER_BIT);
50 glLoadIdentity();
51 camera->SetPerspective(45.0f,640.0f/480.0f,0.1f,1000.0f);
52 camera->Render();
53 MouseCheck(device->GetInput());
54 core::Render::RenderCube((int)logotexture->GetTextureId(),pos,mat.ptr(),sides);
55 END_LOOP(device)
56
57 device->Close();
58 device->Drop();
59
60 return 0;
61 }
62
63 //! 處理鼠標響應
64 void MouseCheck(core::Input* input)
65 {
66 if(input->IsPressedKey(KEY_F1))
67 {
68 mat*=mat.Rotate((rand()%200)/900.0f,1,0,0);
69 }
70 else if(input->IsPressedKey(KEY_F2))
71 {
72 mat*=mat.Rotate((rand()%200)/900.0f,0,1,0);
73 }
74 else if(input->IsPressedKey(KEY_F3))
75 {
76 mat*=mat.Rotate((rand()%200)/900.0f,0,0,1);
77 }
78 }
顯示結果如圖:

2.

其實這里的按鍵消息響應應該采用插槽
當然是使用蓋莫游戲引擎啦。
代碼如下:
1 代碼如下:
2
3 #include <GEngine/Gaimo.hpp>
4 #include <iostream>
5 using namespace std;
6
7 int main(int argc, char **argv)
8 {
9 //! 初始化引擎設備并得到設備指針
10 core::Device* device = core::InitDevice("蓋莫引擎室外場景測試1");
11 //! 得到引擎場景指針
12 core::RefPtr<core::SceneManager> scenemanager = device->GetSceneManager();
13 //! 得到引擎資源指針
14 core::ResourceManager* resourcemanager = device->GetResourceManager();
15
16 //! 獲取lua指針
17 LuaPlus::LuaStateOwner *lua = device->GetLuaStateOwner();
18 //! 載入lua腳本
19 (*lua)->DoFile("..\\script//skybox.lua");
20 //! 獲取天空盒表對象
21 LuaPlus::LuaObject skyboxtable = (*lua)->GetGlobal("skybox");
22
23 //! 得到天空盒圖形和其紋理
24 core::RefPtr<core::Image> skyimage0 = resourcemanager->GetImage("sky1",skyboxtable["front"].GetString());
25 core::RefPtr<core::Image> skyimage1 = resourcemanager->GetImage("sky2",skyboxtable["back"].GetString());
26 core::RefPtr<core::Image> skyimage2 = resourcemanager->GetImage("sky3",skyboxtable["left"].GetString());
27 core::RefPtr<core::Image> skyimage3 = resourcemanager->GetImage("sky4",skyboxtable["right"].GetString());
28 core::RefPtr<core::Image> skyimage4 = resourcemanager->GetImage("sky5",skyboxtable["top"].GetString());
29 core::RefPtr<core::Texture> sky0 = resourcemanager->GetTexture("front",skyimage0);
30 core::RefPtr<core::Texture> sky1 = resourcemanager->GetTexture("back",skyimage1);
31 core::RefPtr<core::Texture> sky2 = resourcemanager->GetTexture("left",skyimage2);
32 core::RefPtr<core::Texture> sky3 = resourcemanager->GetTexture("right",skyimage3);
33 core::RefPtr<core::Texture> sky4 = resourcemanager->GetTexture("top",skyimage4);
34
35 //! 得到天空盒指針
36 core::RefPtr<core::Renderable> skybox = scenemanager->GetSkyBox(sky0,sky1,sky2,sky3,sky4,
37 skyboxtable["width"].GetFloat(),
38 skyboxtable["length"].GetFloat(),
39 skyboxtable["heigth"].GetFloat()
40 ,skyboxtable["rotstep"].GetFloat());
41 //! 載入lua腳本
42 (*lua)->DoFile("..\\script//terrain.lua");
43 //! 獲取地形表對象
44 LuaPlus::LuaObject terraintable = (*lua)->GetGlobal("terrain");
45
46 //! 得到地形圖形和其紋理
47 core::RefPtr<core::Image> terrainimage0 = resourcemanager->GetImage("terrain0",terraintable["image1"].GetString());
48 core::RefPtr<core::Image> terrainimage1 = resourcemanager->GetImage("terrain1",terraintable["image2"].GetString());
49 core::RefPtr<core::Texture> terraintexture0 = resourcemanager->GetTexture("terraim0",terrainimage0);
50 core::RefPtr<core::Texture> terraintexture1 = resourcemanager->GetTexture("terraim1",terrainimage1);
51
52 //! 創建地形描述符
53 core::TerrainDesc desc;
54 desc.main_texture = terraintexture0;
55 desc.detail_texture = terraintexture1;
56 desc.use_detail = terraintable["usedetail"].GetInteger();
57
58 //! 獲取地形指針
59 core::RefPtr<core::Terrain> terrain = scenemanager->GetTerrain(desc);
60 terrain->LoadHeigthMap(terraintable["rawfile"].GetString(),terraintable["mapsize"].GetInteger(),terraintable["cell"].GetInteger());
61
62 //! 獲取全局攝像機
63 core::RefPtr<core::Camera> camera = scenemanager->GetGlobalCamera(Vector3f(250,terrain->GetHeight(250,215)+10,215),
64 Vector3f(251,terrain->GetHeight(251,216)+10,216),
65 Vector3f(0,1,0));
66 camera->SetViewport(0,0,640,480);
67 camera->SetPerspective(50.0f,640.0f/480.0f,0.1f,1000.0f);
68 glClearDepth(1.0f);
69 glDepthFunc(GL_LEQUAL);
70 glEnable(GL_DEPTH_TEST);
71 glEnable(GL_CULL_FACE);
72 glShadeModel(GL_SMOOTH);
73 glHint(GL_PERSPECTIVE_CORRECTION_HINT, GL_NICEST);
74 BEGIN_LOOP(device)
75 glClear(GL_COLOR_BUFFER_BIT | GL_DEPTH_BUFFER_BIT);
76 glLoadIdentity();
77 camera->SetPerspective(45.0f,640.0f/480.0f,0.1f,1000.0f);
78 camera->Render();
79 skybox->Render();
80 terrain->Render();
81 END_LOOP(device)
82
83 device->Close();
84 device->Drop();
85
86 return 0;
87 }
2個lua配置文件
1.
-- 這是蓋莫引擎中使用lua腳本配置天空盒的腳本
1 -- 定義天空盒數據
2 skybox =
3 {
4 front = "..\\image//sky//front.jpg";
5 back = "..\\image//sky//back.jpg";
6 left = "..\\image//sky//left.jpg";
7 right = "..\\image//sky//right.jpg";
8 top = "..\\image//sky//top.jpg";
9 width = 600;
10 length = 600;
11 heigth = 600;
12 rotstep= 0.003;
13 }
2.
1 -- 這是蓋莫引擎中使用lua腳本配置地形的腳本
2
3 -- 定義地形數據
4 terrain =
5 {
6 rawfile = "..\\terrain//terrain.raw";
7 image1 = "..\\terrain//terrain.bmp";
8 image2 = "..\\terrain//detail.bmp";
9 usedetail = 1;
10 mapsize = 1024;
11 cell = 16
12 }
這里使用了簡單的lua表數據結構
當然這個還會不斷改進的
接上文介紹了ode的基本函數,接下來應該考慮如何綁定Ode和游戲引擎
簡單的說,單單使用ode不是什么難事情,必須網上使用ode的例子一大把
問題的關鍵是如何較好的結合ode和引擎,記不至于游戲引擎把ode封裝的太深以至于影響其使用的靈活性.另外一方面是,也不能把過多的額外操作拋給用戶操作。
不過可以先設計一個基本的框架,以后根據需要和認識的不斷加深再做修改。
于是先寫下物理引擎的基本框架-很簡單的了:
1 ////////////////////////////////////////////////////////////
2 /// 定義物理引擎模板類
3 ////////////////////////////////////////////////////////////
4 template<class World,class Space,class JointGroup,class Geom>
5 class PhysicsEngine
6 {
7 public:
8 typedef void(*ContactNearCallback)(void *data, Geom o1, Geom o2);
9 public:
10 ///////////////////////////////////////////////////////
11 /// 構造,析構物理引擎類
12 ///////////////////////////////////////////////////////
13 PhysicsEngine();
14 ~PhysicsEngine();
15 public:
16 ///////////////////////////////////////////////////////
17 /// 設定物理引擎平面(ax+by+cz+d=0)
18 ///////////////////////////////////////////////////////
19 void SetPlane(float a = 0, float b = 0, float c = 1, float d = 0);
20
21 ///////////////////////////////////////////////////////
22 /// 設定物理世界重力加速度
23 ///////////////////////////////////////////////////////
24 void SetGravity(float x = 0, float y = 0, float z = -9.81);
25
26 ///////////////////////////////////////////////////////
27 /// 設定物理世界仿真更新值
28 ///////////////////////////////////////////////////////
29 inline void SetStepValue(float step = 0.05f, bool quick = true)
30 {
31 this->step = step; this->quick = quick;
32 }
33
34 ///////////////////////////////////////////////////////
35 /// 加載引擎物理對象碰撞回調函數
36 ///////////////////////////////////////////////////////
37 inline void SetCollideCallBack(ContactNearCallback callback)
38 {
39 this->callback = callback;
40 }
41
42 ///////////////////////////////////////////////////////
43 /// 調用物理引擎模擬
44 ///////////////////////////////////////////////////////
45 void Simulation();
46
47 ///////////////////////////////////////////////////////
48 /// 獲取物理引擎世界,空間和關節組對象.
49 ///////////////////////////////////////////////////////
50 inline World GetWorld(){return world;}
51 inline Space GetSpace(){return space;}
52 inline JointGroup GetContactGroup(){return contactgroup;}
53 private:
54 World world;
55 Space space;
56 JointGroup contactgroup;
57 ContactNearCallback callback;
58 float step;
59 bool quick;
60 };
61
62 #ifdef PHYSICS_EXT_ODE
63 #include "OdePhysics.inl"
64 #endif
具體對于ode,我看可以這樣使用之:
1 core::PhysicsEngine<dWorldID,dSpaceID,dJointGroupID,dGeomID> engine;
或者可以這樣
1 core::PhysicsEngine<> engine;
再給出一個簡單的物理對象數據結構
1 ////////////////////////////////////////////////////////////
2 /// 定義引擎物理對象數據結構(一個對象由N個幾何體構成)
3 ////////////////////////////////////////////////////////////
4 /*template<class Object,class Geom,int N>
5 struct PhysicsObject
6 {
7 Object object;
8 //! 有必要設計一個定長數組了.
9 Geom geom[N];
10 };*/
一個物理對象由N個簡單幾何體構成
這個是簡單到了極點只是不太符合要求
下一步該考慮設計物理對象類了
對象可以旋轉,平移,設置質量,加掛幾何體.......
最后再上幾個ode函數加深一點認識吧:
1 /**
2 * @brief Set the local offset rotation matrix of a geom from its body.
3 *
4 * Sets the geom's rotational offset in local coordinates.
5 * After this call, the geom will be at a new position determined from the
6 * body's position and the offset.
7 * The geom must be attached to a body.
8 * If the geom did not have an offset, it is automatically created.
9 *
10 * @param geom the geom to set.
11 * @param R the new rotation matrix.
12 * @ingroup collide
13 */
14 ODE_API void dGeomSetOffsetRotation (dGeomID geom, const dMatrix3 R);
設置幾何體相對于其物體的局部旋轉平移矩陣
1 /**
2 * @brief Set the offset position of a geom from its body.
3 *
4 * Sets the geom's positional offset to move it to the new world
5 * coordinates.
6 * After this call, the geom will be at the world position passed in,
7 * and the offset will be the difference from the current body position.
8 * The geom must be attached to a body.
9 * If the geom did not have an offset, it is automatically created.
10 *
11 * @param geom the geom to set.
12 * @param x the new X coordinate.
13 * @param y the new Y coordinate.
14 * @param z the new Z coordinate.
15 * @ingroup collide
16 */
17 ODE_API void dGeomSetOffsetWorldPosition (dGeomID geom, dReal x, dReal y, dReal z);
生成,設置幾何對象的函數:
1 ODE_API dGeomID dCreateSphere (dSpaceID space, dReal radius);
2 ODE_API void dGeomSphereSetRadius (dGeomID sphere, dReal radius);
3 ODE_API dReal dGeomSphereGetRadius (dGeomID sphere);
4 ODE_API dGeomID dCreateBox (dSpaceID space, dReal lx, dReal ly, dReal lz);
5 ODE_API void dGeomBoxSetLengths (dGeomID box, dReal lx, dReal ly, dReal lz);
6 ODE_API void dGeomBoxGetLengths (dGeomID box, dVector3 result);
7 ODE_API dGeomID dCreateCapsule (dSpaceID space, dReal radius, dReal length);
8 ODE_API void dGeomCapsuleSetParams (dGeomID ccylinder, dReal radius, dReal length);
9 ODE_API void dGeomCapsuleGetParams (dGeomID ccylinder, dReal *radius, dReal *length);
10 ODE_API dReal dGeomCapsulePointDepth (dGeomID ccylinder, dReal x, dReal y, dReal z);
11 ODE_API dGeomID dCreateCylinder (dSpaceID space, dReal radius, dReal length);
12 ODE_API void dGeomCylinderSetParams (dGeomID cylinder, dReal radius, dReal length);
13 ODE_API void dGeomCylinderGetParams (dGeomID cylinder, dReal *radius, dReal *length);
14 ODE_API dGeomID dCreateRay (dSpaceID space, dReal length);
15 ODE_API void dGeomRaySetLength (dGeomID ray, dReal length);
16 ODE_API dReal dGeomRayGetLength (dGeomID ray);
17 ODE_API void dGeomRaySet (dGeomID ray, dReal px, dReal py, dReal pz,
18 dReal dx, dReal dy, dReal dz);
19 ODE_API void dGeomRayGet (dGeomID ray, dVector3 start, dVector3 dir);
剛使用dev c++編譯完ode0.11.1庫
現在說明下如何編譯之(說實話有些開源庫似乎不是太容易編譯的)
1.從http://sourceforge.net/projects/opende/files/下載ode庫
2.ode庫是依賴于opcode庫的所以先要編譯opcod庫
3.為簡便起見把ode中的
#if defined(_MSC_VER)
#if defined(ODE_DLL)
#define ODE_API __declspec(dllexport)
#elif !defined(ODE_LIB)
#define ODE_DLL_API __declspec(dllimport)
#endif
#endif
#if !defined(ODE_API)
#define ODE_API
#endif
直接使用
#define ODE_API __declspec(dllexport) 代替之
4.對于opcode庫也一樣
5.編譯opcode庫
6.編譯ode庫如何發現有沒定義的alloca函數則包含頭文件malloc于所在問題
7.對于其它一些沒定義的函數或者數據結構也要加上其函數聲明的頭文件
本人使用devc++編譯過的開源庫列表
1.zthread.
2.glfw
3.ogg
4.libmad
5.freetype
6.ftgl
7...
題外話,
ode大致的函數看過了
ode也編譯了
ode所帶的例子也看過了
那下一步的動作是?
接著上文繼續學習ode物理引擎的函數和數據結構O(∩_∩)O~
15.剛體對象的啟用和禁止
剛體對象可以被啟用或者禁止
禁止剛體對象則在仿真過程中剛體不參與仿真
如果啟用自禁止的話,那么剛體對象會在給定仿真步中idle(如何翻譯?)
如果啟用自動禁止的話,那么當剛體線速度和角速度同時小于給定閾值之時被禁止
1 void dBodyEnable (dBodyID);
2 void dBodyDisable (dBodyID);
3 int dBodyIsEnabled (dBodyID);
4 void dBodySetAutoDisableFlag (dBodyID, int do_auto_disable);
5 int dBodyGetAutoDisableFlag (dBodyID);
1 void dBodySetAutoDisableAngularThreshold (dBodyID, dReal angular_threshold);
2dReal dBodyGetAutoDisableAngularThreshold (dBodyID);
3void dBodySetAutoDisableLinearThreshold (dBodyID, dReal linear_threshold);
4dReal dBodyGetAutoDisableLinearThreshold (dBodyID);
需要確保的是線速度和角速度要小于給定的閾值
16.幾個雜項函數
1 void dBodySetData (dBodyID, void *data);
2 void *dBodyGetData (dBodyID);
設置,和獲取剛體數據
1 int dBodyGetNumJoints (dBodyID b);
獲取關聯到物體上的關節個數
1 dJointID dBodyGetJoint (dBodyID, int index);
獲取給物體上定標號的關節句柄
1 void dBodySetGravityMode (dBodyID b, int mode);
2 int dBodyGetGravityMode (dBodyID b);
設置和獲取物體是否受重力影響(默認為是)
1 void dMakeRandomVector (dReal *A, int n, dReal range);
獲取n個范圍在+-rang中的隨機變量
17.矩陣操作
-- 在任何引擎中矩陣都是必不可少的
1 void dRSetIdentity (dMatrix3 R);
2 void dRFromAxisAndAngle (dMatrix3 R, dReal ax, dReal ay, dReal az,dReal angle);
3 void dRFromEulerAngles (dMatrix3 R, dReal phi, dReal theta, dReal psi);
4 void dRFrom2Axes (dMatrix3 R, dReal ax, dReal ay, dReal az,dReal bx, dReal by, dReal bz);
5 void dRFromZAxis (dMatrix3 R, dReal ax, dReal ay, dReal az);
6 void dQSetIdentity (dQuaternion q);
7 void dQFromAxisAndAngle (dQuaternion q, dReal ax, dReal ay, dReal az,dReal angle);
8 void dQMultiply0 (dQuaternion qa, const dQuaternion qb, const dQuaternion qc);
9 void dQMultiply3 (dQuaternion qa, const dQuaternion qb, const dQuaternion qc);
10 void dRfromQ (dMatrix3 R, const dQuaternion q);
11 void dQfromR (dQuaternion q, const dMatrix3 R);
12 void dDQfromW (dReal dq[4], const dVector3 w, const dQuaternion q);
這些函數為別是:
設置為單位矩陣,
從給定軸和角度或者矩陣
從歐拉角到矩陣
...
18.ode關節
1 dJointID dJointCreateBall (dWorldID, dJointGroupID);
2 dJointID dJointCreateHinge (dWorldID, dJointGroupID);
3 dJointID dJointCreateSlider (dWorldID, dJointGroupID);
4 dJointID dJointCreateContact (dWorldID, dJointGroupID,
5 const dContact *);
6 dJointID dJointCreateUniversal (dWorldID, dJointGroupID);
7 dJointID dJointCreateHinge2 (dWorldID, dJointGroupID);
8 dJointID dJointCreateFixed (dWorldID, dJointGroupID);
9 dJointID dJointCreateAMotor (dWorldID, dJointGroupID);
10 void dJointDestroy (dJointID);
可以看出ode中定義的關機類型有Ball,Hinge,Slider,...
對關節的銷毀動作為斷開所有連接的引擎物體,再銷毀關節
1 dJointGroupID dJointGroupCreate (int max_size);
2 void dJointGroupDestroy (dJointGroupID);
3 void dJointGroupEmpty (dJointGroupID);
4
第一個函數中的max_size目前必須是(0)這是為了和以前兼容
銷毀關節和清空關節點區別在于銷毀會銷毀關節組中所有的關節對象和銷毀關節組,而清空關節組則只是銷毀所有的關節對象
1 void dJointAttach (dJointID, dBodyID body1, dBodyID body2);
使用給定關節連接2個物理對象,如果關節先前是連接的則斷開之,如果body1或者body2有1個為0則說明把對象連接對靜態環境中去
1 void dJointSetData (dJointID, void *data);
2 void *dJointGetData (dJointID);
設置關節數據沒什么好說的
1 int dJointGetType (dJointID);
獲取給定關節的關節類型
可能的類型有
dJointTypeBall A ball-and-socket joint.
dJointTypeHinge A hinge joint.
dJointTypeSlider A slider joint.
dJointTypeContact A contact joint.
dJointTypeUniversal A universal joint.
dJointTypeHinge2 A hinge-2 joint.
dJointTypeFixed A fixed joint.
dJointTypeAMotor An angular motor joint.
1 dBodyID dJointGetBody (dJointID, int index);
獲取關節給定索引的連接物理對象(以0索引起始)
1 int dAreConnected (dBodyID, dBodyID);
檢測2個問題是不是別連接了
19.關節接觸;
ode用戶指南的原文是:
The contact joint prevents body 1 and body 2 from inter-penetrating at the contact point. It does this by
only allowing the bodies to have an "outgoing "velocity in the direction of the contact normal. Contact joints
typically have a lifetime of one time step. They are created and deleted in response to collision detection.
Contact joints can simulate friction at the contact by applying special forces in the two friction directions
that are perpendicular to the normal.When a contact joint is created, a dContact structure must be supplied. This has the following definition:
接觸關節預防碰撞對象的"刺穿"問題,當接觸關節產生的時候,其必要的數據元素必須被標記
1 struct dContact {
2 dSurfaceParameters surface;
3 dContactGeom geom;
4 dVector3 fdir1;
5 };
goem是碰撞函數設置的數據結構其中包含了:
碰撞點,碰撞法向矢量和碰撞的2個對象id
而fdir是第一摩擦力方向(其方向和摩擦力方向是相同的),同時也是垂直于接觸面法向矢量的.
當且僅當surface.mode = dContactFDir1時期需要被定義
而第二摩擦力方向則是由第一摩擦里方向和接觸面方向矢量計算的正交向量
其中的dSurfaceParameters surface是由用戶設置的數據結構
其數據結構為:
1 typedef struct dSurfaceParameters {
2 /* must always be defined */
3 int mode;
4 dReal mu;
5
6 /* only defined if the corresponding flag is set in mode */
7 dReal mu2;
8 dReal bounce;
9 dReal bounce_vel;
10 dReal soft_erp;
11 dReal soft_cfm;
12 dReal motion1,motion2;
13 dReal slip1,slip2;
14 } dSurfaceParameters;
其中的mode必須被標記
mu和mu2取值為(0 to dInfinity.)
如果沒有設置mu2,則使用mu為2個摩擦力方向
如果設置了mu2則使用mu為第一個摩擦力方向使用mu2為第二摩擦力方向
如果設置了fdir1則使用fdir作為第一摩擦力方向要不然則自動獲取其值
bounce表明其為彈性表面也就是說碰撞對象會相互彈起(取值0-1)0標明完全沒有彈性
soft_erp控制的是接觸表面的erp,這個值可以設置柔性表面
soft_cfm控制的是柔性表面的最大cfm
其他參數以后再介紹之
20.幾何體對象
幾何體是檢測系統中的基本單元
幾何體的銷毀和生成
1 void dGeomDestroy (dGeomID);
2 void dGeomSetData (dGeomID, void *);
3 void *dGeomGetData (dGeomID);
4 void dGeomSetBody (dGeomID, dBodyID);
5 dBodyID dGeomGetBody (dGeomID);
6 void dGeomSetPosition (dGeomID, dReal x, dReal y, dReal z);
7 void dGeomSetRotation (dGeomID, const dMatrix3 R);
8 void dGeomSetQuaternion (dGeomID, const dQuaternion);
9 const dReal * dGeomGetPosition (dGeomID);
10 const dReal * dGeomGetRotation (dGeomID);
11 void dGeomGetQuaternion (dGeomID, dQuaternion result);
12 void dGeomGetAABB (dGeomID, dReal aabb[6]);
13 int dGeomIsSpace (dGeomID);
14 dSpaceID dGeomGetSpace (dGeomID);
其中有幾何體的銷毀,設置幾何體數據,關聯幾何體到缸體
設置,獲取幾何體旋轉,
獲取幾何體aabb盒子以及檢測幾何體是否在空間中
1 int dGeomGetClass (dGeomID);
這是獲取幾何體類型的函數其取值為:
dSphereClass Sphere
dBoxClass Box
dCCylinderClass Capped cylinder
dCylinderClass Regular flat-ended cylinder
dPlaneClass Infinite plane (non-placeable)
dGeomTransformClass Geometry transform
dRayClass Ray
dTriMeshClass Triangle mesh
dSimpleSpaceClass Simple space
dHashSpaceClass Hash table based space
int dGeomGetClass (dGeomID);
下面的是幾何體的禁止和啟用
1 void dGeomEnable (dGeomID);
2 void dGeomDisable (dGeomID);
3 int dGeomIsEnabled (dGeomID);
如果幾何體被禁止那么他就不會才與碰撞(盡管它在物理空間中)
該篇就到這里吧,這里給出一個典型的接觸面設置:
1 surface.mode = dContactBounce | dContactSoftCFM;
2 surface.mu = dInfinity;
3 surface.mu2 = 0;
4 surface.bounce = 0.01;
5 surface.bounce_vel = 0.1;
6 surface.soft_cfm = 0.01;
可以看出他是使用了接觸面彈起
其第一摩擦力方向和第二摩擦力方向是相同的
常見的物理引擎有ode,newtow,phycisX,Havok以及子彈引擎等等
本文介紹ode物理引擎中常用的函數:
1.獲取物理引擎世界,大部分程序我們僅僅需要一個world(返回值為世界句柄)
dWorldID dWorldCreate();
2.銷毀給定的物理引擎世界和包含的所有物體和不包含在關節組中的所有關節
1 dWorldDestroy (dWorldID);
3.設置和獲取物理世界中的重力加速度
1 void dWorldSetGravity (dWorldID, dReal x, dReal y, dReal z);
2 void dWorldGetGravity (dWorldID, dVector3 gravity);
其單位是m/s^2,假定z軸向上的話,那么地球重力加速度是(0,0,-9.81)
在ode中默認的重力加速度是(0,0,0)
4.設置和獲取引擎仿真步修正誤差
1 void dWorldSetERP (dWorldID, dReal erp);
2 dReal dWorldGetERP (dWorldID);
典型的取值為(0.-0.8),默認取值為0.2
5.設置引擎全局混合約束力(constraint force mixing)
1 void dWorldSetCFM (dWorldID, dReal cfm);
2 dReal dWorldGetCFM (dWorldID);
典型取值為(10e-9,1)之間,
默認值為單精度時為10e-5,雙精度時為10e-10
6.物理世界的更新操作
1 void dWorldStep (dWorldID, dReal stepsize);
2 void dWorldQuickStep (dWorldID, dReal stepsize);
stepsize為步進大小一般可取為0.5f
可簡單描述為dWorldStep:精度高但是速度低
dWorldQuickStep:精度低但是速度快
7.設置和獲取仿真步迭代器個數
1void dWorldSetQuickStepNumIterations (dWorldID, int num);
2int dWorldGetQuickStepNumIterations (dWorldID);
默認的迭代器個數為20.迭代器越多則結果越精確但是速度會變慢
8.設置和獲取對象接觸修正速度
void dWorldSetContactMaxCorrectionVel (dWorldID, dReal vel);
dReal dWorldGetContactMaxCorrectingVel (dWorldID);
其默認值是沒有限制的
簡言之該函數決定了對象碰撞之后對象的速度變化上限
9.設置對象表面接觸深度
1 void dWorldSetContactSurfaceLayer (dWorldID, dReal depth);
2 dReal dWorldGetContactSurfaceLayer (dWorldID);
默認的大小是0也就是對象不會透過對象
給定一個極小值比如0.01可以預防振動問題
接下來是一些剛體函數:
10.獲取和銷毀給定空間中的剛體對象
1 dBodyID dBodyCreate (dWorldID);
2 void dBodyDestroy (dBodyID);
新生成的剛體質量為默認值,其位置在0點
銷毀一個剛體其附加的關節點并不會消除也就是說不會影響仿真
11.剛體的位置和旋轉操作
1 void dBodySetPosition (dBodyID, dReal x, dReal y, dReal z);
2 void dBodySetRotation (dBodyID, const dMatrix3 R);
3 void dBodySetQuaternion (dBodyID, const dQuaternion q);
4 void dBodySetLinearVel (dBodyID, dReal x, dReal y, dReal z);
5 void dBodySetAngularVel (dBodyID, dReal x, dReal y, dReal z);
6 const dReal * dBodyGetPosition (dBodyID);
7 const dReal * dBodyGetRotation (dBodyID);
8 const dReal * dBodyGetQuaternion (dBodyID);
9 const dReal * dBodyGetLinearVel (dBodyID);
10 const dReal * dBodyGetAngularVel (dBodyID);
這些函數含義很明顯,需要注意的就是
dBodyGetRotation返回的是一個4*3的旋轉矩陣
12.設置,獲取剛體質量
1 void dBodySetMass (dBodyID, const dMass *mass);
2 void dBodyGetMass (dBodyID, dMass *mass);
13.剛體受力
1 void dBodyAddForce (dBodyID, dReal fx, dReal fy, dReal fz);
2 void dBodyAddTorque (dBodyID, dReal fx, dReal fy, dReal fz);
3 void dBodyAddRelForce (dBodyID, dReal fx, dReal fy, dReal fz);
4 void dBodyAddRelTorque (dBodyID, dReal fx, dReal fy, dReal fz);
5 void dBodyAddForceAtPos (dBodyID, dReal fx, dReal fy, dReal fz,
6 dReal px, dReal py, dReal pz);
7 void dBodyAddForceAtRelPos (dBodyID, dReal fx, dReal fy, dReal fz,
8 dReal px, dReal py, dReal pz);
9 void dBodyAddRelForceAtPos (dBodyID, dReal fx, dReal fy, dReal fz,
10 dReal px, dReal py, dReal pz);
11 void dBodyAddRelForceAtRelPos (dBodyID, dReal fx, dReal fy, dReal fz,
12 dReal px, dReal py, dReal pz);
四個參數的函數表明受力點為剛體質心
7個參數的函數表明受力點位剛體給定點位置
1 const dReal * dBodyGetForce (dBodyID);
2 const dReal * dBodyGetTorque (dBodyID);
3 void dBodySetForce (dBodyID b, dReal x, dReal y, dReal z);
4 void dBodySetTorque (dBodyID b, dReal x, dReal y, dReal z);
注意這是剛體受力和扭矩設置,獲取函數
這對于清空剛體受力或者扭矩很有作用
最后是幾個ode空間函數
14.空間的構造和析構
1 dSpaceID dSimpleSpaceCreate (dSpaceID space);
2 dSpaceID dHashSpaceCreate (dSpaceID space);
3 dSpaceID dQuadTreeSpaceCreate (dSpaceID space, dVector3 Center, dVector3 Extents, int Depth);
4 void dSpaceDestroy (dSpaceID);
15.空間平面坐標系設定
dCreatePlane(space, a, b, c, d);
參數a,b,c,d滿足以下函數關系
ax+by+cz = d;
那么
1 dCreatePlane(space, 0, 1, 0, 0);
2 dWorldSetGravity(world, 0, -0.8, 0);
的含義是
以空間y軸為重力加速度效果方向
其重力加速度大小為-0.8速度為沿y軸向下.
給引擎正式加入對lua腳本的支持
其實最便利的辦法就是腳本和引擎獨立開來,但是這樣不便于c++和lua的通信
若是把lua全部都封裝進引擎則由于lua和c++是2個不同的語言很難實現
再者封裝的一個弊端是封裝的越好則越的其靈活性降低
考慮下我把引擎lua上下文設計成了以下的樣子:
1 ////////////////////////////////////////////////////////////
2 /// 定義引擎Lua腳本上下文
3 ////////////////////////////////////////////////////////////
4 class LuaContext : public core::Object
5 {
6 public:
7 ///////////////////////////////////////////////////////
8 /// 構造,析構引擎Lua腳本上下文
9 ///////////////////////////////////////////////////////
10 LuaContext(){}
11 virtual ~LuaContext(){}
12 public:
13 #ifdef LUA_EXT_LUAPLUS
14 ///////////////////////////////////////////////////////
15 /// 獲取luastateowner指針
16 ///////////////////////////////////////////////////////
17 virtual LuaPlus::LuaStateOwner* GetLuaStateOwner() = 0;
18 #endif
19 ///////////////////////////////////////////////////////
20 /// 執行給定lua腳本字符串
21 ///////////////////////////////////////////////////////
22 virtual int DoStirng(const char* script) = 0;
23
24 ///////////////////////////////////////////////////////
25 /// 載入給定lua腳本并執行(.lua,.luac)
26 ///////////////////////////////////////////////////////
27 virtual int DoFile(const char* luafile) = 0;
28 public:
29 ///////////////////////////////////////////////////////
30 /// 從lua上下文中獲取給定名字的全局整數變量
31 ///////////////////////////////////////////////////////
32 virtual int GetInteger(const char* var, int def = 0) = 0;
33
34 ///////////////////////////////////////////////////////
35 /// 從lua上下文中獲取給定名字的全局浮點數變量 GetDouble()
36 ///////////////////////////////////////////////////////
37 virtual float GetFloat(const char* var, float def = 0.0f) = 0;
38 virtual double GetDouble(const char* var, double def = 0.0) = 0;
39
40 ///////////////////////////////////////////////////////
41 /// 從lua上下文中獲取給定名字的全局字符串變量(len為字符串長度)
42 ///////////////////////////////////////////////////////
43 virtual const char* GetString(const char* var, int &len) = 0;
44
45 ///////////////////////////////////////////////////////
46 /// 從lua上下文中獲取給定名字的全局布爾變量(flag為標記符號)
47 ///////////////////////////////////////////////////////
48 virtual bool GetBoolean(const char* var, bool &flag) = 0;
49
50 ///////////////////////////////////////////////////////
51 /// 執行lua上下文中的給定函數(該函數既無參數也無返回值)
52 ///////////////////////////////////////////////////////
53 virtual void RunFunction(const char* fn) = 0;
54
55 DECLARE_OBJECT(LuaContext)
56 };
57
通過GetLuaStateOnwer獲取引擎全局的lua state指針.
當然LuaContext中只是簡單封裝了一些獲取全局變量的函數.
當然這些是最常用的.
隨著引擎的開發我再根據情況加入更多可能的函數.