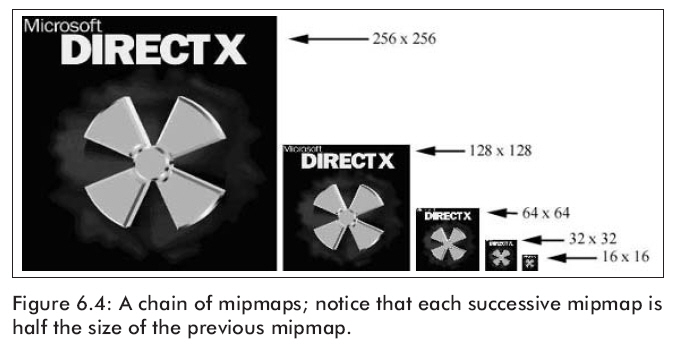
就象6.3節所說的,在屏幕上的三角形和紋理三角形通常是不一樣大的。為了使這個大小差異變小,我們為紋理創建mipmaps鏈。也就是說將一個紋理創建成連續的變小的紋理,但是對它們等級進行定制過濾,因此對我們來說保存細節是很重要的(如圖6.4)。
6.4.1 Mipmaps過濾器
mipmap過濾器是被用來控制Direct3D使用mipmaps的。設置mipmap過濾器,你可以這樣寫:
|
Device->SetSamplerState(0,
D3DSAMP_MIPFILTER, Filter);
|
在Filter處你能用下面三個選項中的一個:
D3DTEXF_NONE——不使用mipmap。
D3DTEXF_POINT——通過使用這個過濾器,Direct3D將選擇與屏幕三角形大小最接近的mipmap等級。一旦等級選定了,Direct3D就將按照指定的過濾器進行縮小和放大過濾。
D3DTEXF_LINEAR——通過使用這個過濾器,Direct3D將選擇兩個最接近的mipmap等級,縮小和放大過濾每個等級,然后線性聯合計算它們兩個等級來得到最終的顏色值。
以前,我們規定紋理坐標必須指定在[0,1]之間。從技術上來說這是不正確的;他們能夠超出這個范圍。紋理坐標也可以在[0,1]的范圍之外,它通過Direct3D的尋址模式來定義。這里有四種尋址模式:環繞紋理尋址模式、邊框顏色紋理尋址模式、截取紋理尋址模式、鏡像紋理尋址模式,這里分別給出了它們的示意圖6.5,6.6,6.7,6.8。
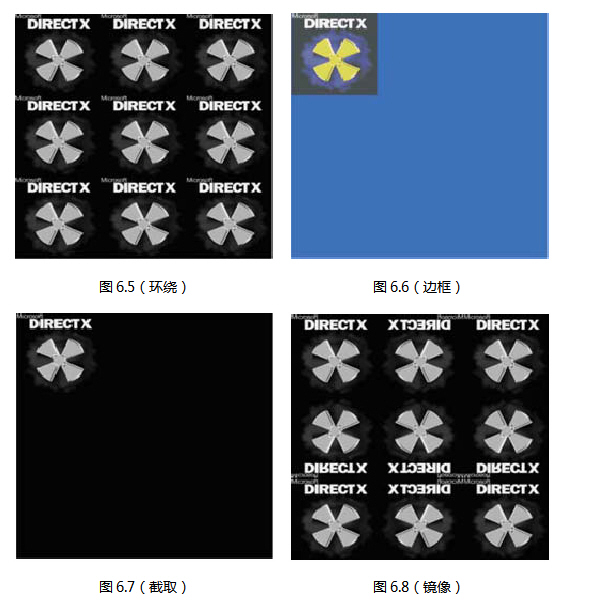
在這些圖片中,紋理坐標通過(0,0)(0,3)(3,0)(3,3)頂點來定義。在u軸和v軸上方塊又被分成子塊放進3×3的矩陣中。假如,你想讓紋理按5×5的方格來平鋪,你就應該指定環繞紋理尋址模式并且紋理坐標應該設置為(0,0)(0,5)(5,0)(5,5)。
Sampler states define texture sampling operations such
as texture addressing and texture filtering. Some sampler states set-up vertex
processing, and some set-up pixel processing. Sampler states can be saved and
restored using stateblocks (see State Blocks Save and Restore State (Direct3D
9)).
typedef enum D3DSAMPLERSTATETYPE
{
    D3DSAMP_ADDRESSU = 1,
    D3DSAMP_ADDRESSV = 2,
    D3DSAMP_ADDRESSW = 3,
    D3DSAMP_BORDERCOLOR = 4,
    D3DSAMP_MAGFILTER = 5,
    D3DSAMP_MINFILTER = 6,
    D3DSAMP_MIPFILTER = 7,
    D3DSAMP_MIPMAPLODBIAS = 8,
    D3DSAMP_MAXMIPLEVEL = 9,
    D3DSAMP_MAXANISOTROPY = 10,
    D3DSAMP_SRGBTEXTURE = 11,
    D3DSAMP_ELEMENTINDEX = 12,
    D3DSAMP_DMAPOFFSET = 13,
    D3DSAMP_FORCE_DWORD = 0x7fffffff,
} D3DSAMPLERSTATETYPE, *LPD3DSAMPLERSTATETYPE;
Constants
- D3DSAMP_ADDRESSU
- Texture-address mode for the u coordinate. The
default is D3DTADDRESS_WRAP. For more information, see D3DTEXTUREADDRESS.
- D3DSAMP_ADDRESSV
- Texture-address mode for the v coordinate. The
default is D3DTADDRESS_WRAP. For more information, see D3DTEXTUREADDRESS.
- D3DSAMP_ADDRESSW
- Texture-address mode for the w coordinate. The
default is D3DTADDRESS_WRAP. For more information, see D3DTEXTUREADDRESS.
- D3DSAMP_BORDERCOLOR
- Border color or type D3DCOLOR. The default color
is 0x00000000.
- D3DSAMP_MAGFILTER
- Magnification filter of type D3DTEXTUREFILTERTYPE.
The default value is D3DTEXF_POINT.
- D3DSAMP_MINFILTER
- Minification filter of type
D3DTEXTUREFILTERTYPE. The default value is D3DTEXF_POINT.
- D3DSAMP_MIPFILTER
- Mipmap filter to use during minification. See
D3DTEXTUREFILTERTYPE. The default value is D3DTEXF_NONE.
- D3DSAMP_MIPMAPLODBIAS
- Mipmap level-of-detail bias. The default value is
zero.
- D3DSAMP_MAXMIPLEVEL
- level-of-detail index of largest map to use.
Values range from 0 to (n - 1) where 0 is the largest. The default value is
zero.
- D3DSAMP_MAXANISOTROPY
- DWORD maximum anisotropy. The default value is 1.
- D3DSAMP_SRGBTEXTURE
- Gamma correction value. The default value is 0,
which means gamma is 1.0 and no correction is required. Otherwise, this
value means that the sampler should assume gamma of 2.2 on the content and
convert it to linear (gamma 1.0) before presenting it to the pixel shader.
- D3DSAMP_ELEMENTINDEX
- When a multielement texture is assigned to the
sampler, this indicates which element index to use. The default value is 0.
- D3DSAMP_DMAPOFFSET
- Vertex offset in the presampled displacement map.
This is a constant used by the tessellator, its default value is 0.
- D3DSAMP_FORCE_DWORD
- Forces this enumeration to compile to 32 bits in
size. Without this value, some compilers would allow this enumeration to
compile to a size other than 32 bits. This value is not used.
下面的代碼片段列舉的是怎樣設置這四種尋址模式:
// set wrap address mode
if( ::GetAsyncKeyState('W') & 0x8000f )
{
Device->SetSamplerState(0, D3DSAMP_ADDRESSU, D3DTADDRESS_WRAP);
Device->SetSamplerState(0, D3DSAMP_ADDRESSV, D3DTADDRESS_WRAP);
}
// set border color address mode
if( ::GetAsyncKeyState('B') & 0x8000f )
{
Device->SetSamplerState(0, D3DSAMP_ADDRESSU, D3DTADDRESS_BORDER);
Device->SetSamplerState(0, D3DSAMP_ADDRESSV, D3DTADDRESS_BORDER);
Device->SetSamplerState(0, D3DSAMP_BORDERCOLOR, 0x000000ff);
}
// set clamp address mode
if( ::GetAsyncKeyState('C') & 0x8000f )
{
Device->SetSamplerState(0, D3DSAMP_ADDRESSU, D3DTADDRESS_CLAMP);
Device->SetSamplerState(0, D3DSAMP_ADDRESSV, D3DTADDRESS_CLAMP);
}
// set mirror address mode
if( ::GetAsyncKeyState('M') & 0x8000f )
{
Device->SetSamplerState(0, D3DSAMP_ADDRESSU, D3DTADDRESS_MIRROR);
Device->SetSamplerState(0, D3DSAMP_ADDRESSV, D3DTADDRESS_MIRROR);
}
6.6實例程序:有紋理的方塊
這個例子演示怎樣為方塊加上紋理以及設置一個紋理過濾器(如圖6.9)。假如你的顯卡支持,通過D3DXCreateTextureFromFile函數一個mipmap鏈將被自動創建。

圖6.9
為一個場景增加紋理的必要步驟是:
1. 構造物體的頂點并指定紋理坐標。
2. 用D3DXCreateTextureFromFile函數讀取一個紋理到IDirect3DTexture9接口中。
3. 設置縮小倍數,放大倍數以及mipmap過濾器。
4. 在你繪制一個物體前,用IDirect3DDevice9::SetTexture設置與物體關聯的紋理。
源程序:
/**************************************************************************************
Renders a textured quad. Demonstrates creating a texture, setting texture filters,
enabling a texture, and texture coordinates.
**************************************************************************************/
#include "d3dUtility.h"
#pragma warning(disable : 4100)
const int WIDTH = 640;
const int HEIGHT = 480;
IDirect3DDevice9* g_d3d_device;
IDirect3DVertexBuffer9* g_quad_vb;
IDirect3DTexture9* g_d3d_texture;
class cTextureVertex
{
public:
float m_x, m_y, m_z;
float m_nx, m_ny, m_nz;
float m_u, m_v; // texture coordinates
cTextureVertex() { }
cTextureVertex(float x, float y, float z,
float nx, float ny, float nz,
float u, float v)
{
m_x = x; m_y = y; m_z = z;
m_nx = nx; m_ny = ny; m_nz = nz;
m_u = u; m_v = v;
}
};
const DWORD TEXTURE_VERTEX_FVF = D3DFVF_XYZ | D3DFVF_NORMAL | D3DFVF_TEX1;
////////////////////////////////////////////////////////////////////////////////////////////////////
bool setup()
{
// create the quad vertex buffer and fill it with the quad geometry
g_d3d_device->CreateVertexBuffer(6 * sizeof(cTextureVertex), D3DUSAGE_WRITEONLY, TEXTURE_VERTEX_FVF,
D3DPOOL_MANAGED, &g_quad_vb, NULL);
cTextureVertex* vertices;
g_quad_vb->Lock(0, 0, (void**)&vertices, 0);
// quad built from two triangles, note texture coordinate.
vertices[0] = cTextureVertex(-1.0f, -1.0f, 1.25f, 0.0f, 0.0f, -1.0f, 0.0f, 1.0f);
vertices[1] = cTextureVertex(-1.0f, 1.0f, 1.25f, 0.0f, 0.0f, -1.0f, 0.0f, 0.0f);
vertices[2] = cTextureVertex( 1.0f, 1.0f, 1.25f, 0.0f, 0.0f, -1.0f, 1.0f, 0.0f);
vertices[3] = cTextureVertex(-1.0f, -1.0f, 1.25f, 0.0f, 0.0f, -1.0f, 0.0f, 1.0f);
vertices[4] = cTextureVertex( 1.0f, 1.0f, 1.25f, 0.0f, 0.0f, -1.0f, 1.0f, 0.0f);
vertices[5] = cTextureVertex( 1.0f, -1.0f, 1.25f, 0.0f, 0.0f, -1.0f, 1.0f, 1.0f);
g_quad_vb->Unlock();
// create the texture and set filters
D3DXCreateTextureFromFile(g_d3d_device, "dx5_logo.bmp", &g_d3d_texture);
g_d3d_device->SetTexture(0, g_d3d_texture);
g_d3d_device->SetSamplerState(0, D3DSAMP_MAGFILTER, D3DTEXF_LINEAR);
g_d3d_device->SetSamplerState(0, D3DSAMP_MINFILTER, D3DTEXF_LINEAR);
g_d3d_device->SetSamplerState(0, D3DSAMP_MIPFILTER, D3DTEXF_POINT);
// don't use lighting for this sample
g_d3d_device->SetRenderState(D3DRS_LIGHTING, FALSE);
// set the projection matrix
D3DXMATRIX proj;
D3DXMatrixPerspectiveFovLH(&proj, D3DX_PI * 0.5f, (float)WIDTH/HEIGHT, 1.0f, 1000.0f);
g_d3d_device->SetTransform(D3DTS_PROJECTION, &proj);
return true;
}
void cleanup()
{
safe_release<IDirect3DVertexBuffer9*>(g_quad_vb);
safe_release<IDirect3DTexture9*>(g_d3d_texture);
}
bool display(float time_delta)
{
g_d3d_device->Clear(0, NULL, D3DCLEAR_TARGET | D3DCLEAR_ZBUFFER, 0xffffffff, 1.0f, 0);
g_d3d_device->BeginScene();
g_d3d_device->SetStreamSource(0, g_quad_vb, 0, sizeof(cTextureVertex));
g_d3d_device->SetFVF(TEXTURE_VERTEX_FVF);
g_d3d_device->DrawPrimitive(D3DPT_TRIANGLELIST, 0, 2);
g_d3d_device->EndScene();
g_d3d_device->Present(NULL, NULL, NULL, NULL);
return true;
}
LRESULT CALLBACK wnd_proc(HWND hwnd, UINT msg, WPARAM word_param, LPARAM long_param)
{
switch(msg)
{
case WM_DESTROY:
PostQuitMessage(0);
break;
case WM_KEYDOWN:
if(word_param == VK_ESCAPE)
DestroyWindow(hwnd);
break;
}
return DefWindowProc(hwnd, msg, word_param, long_param);
}
int WINAPI WinMain(HINSTANCE inst, HINSTANCE, PSTR cmd_line, int cmd_show)
{
if(! init_d3d(inst, WIDTH, HEIGHT, true, D3DDEVTYPE_HAL, &g_d3d_device))
{
MessageBox(NULL, "init_d3d() - failed.", 0, MB_OK);
return 0;
}
if(! setup())
{
MessageBox(NULL, "Steup() - failed.", 0, MB_OK);
return 0;
}
enter_msg_loop(display);
cleanup();
g_d3d_device->Release();
return 0;
}
setup程序是很容易讀懂的;我們用已經定義了紋理坐標的兩個三角形創建一個方塊。然后把文件dx5_logo.bmp讀進IDirect3DTexture9接口中。接著使用SetTexture方法賦予紋理,最后設置縮小和放大過濾器進行線性過濾,我們也可以設置mipmap過濾器來進行D3DTEXF_POINT。
下載源程序