有關(guān)ICE的基礎(chǔ)知識(shí),請參照前面的ICE專題文章。由于這些文章均來自于網(wǎng)絡(luò),故未發(fā)之于首頁。下面僅僅給出相關(guān)link:
ICE專題:利用ICE編寫程序的幾個(gè)注意點(diǎn)
ICE專題:ICE架構(gòu)
ICE專題:ICE起步
ICE專題:ICE的5個(gè)服務(wù)
ICE專題:使用C#編寫ICE分布式應(yīng)用程序
ICE專題:學(xué)習(xí)ICE 3.0
ICE專題:在客戶端中如何定位服務(wù)器(即如何尋找代理)
ICE專題:ICE在Linux下的安裝
ICE專題:ICE簡介
目標(biāo):在Windows平臺(tái)上編寫第一個(gè)基于ICE的Hello Word程序。
1、安裝
從http://www.zeroc.com/download.html#bin下載安裝文件:
Windows Installer for Visual Studio 2005
Ice-3.2.0-VC80.msi
【必需】
Everything needed to use Ice on Windows XP/Server 2003/Vista in C++, Java, C#, Visual Basic and Python. This installer includes executables, debug and release DLLs, header files, import libraries, PDBs, Java classes, sample programs, and third-party dependencies.
Visual Studio 2005 is only required for C++, C#, and Visual Basic developers. Visual Studio 2005 Express compilers are also supported.
Ice-3.2.0-ThirdParty-VC80.msi
Use this installer if you want to build Ice for C++ or Ice for Java from sources. It includes header files, debug/release DLLs, and JAR files for Ice's third-party dependencies:
- Berkeley DB 4.5.20
- OpenSSL 0.9.8d
- Libbzip2 1.0.3
- Expat 2.0.0
Ice for Java users who do not want to install the full Ice distribution may also find this installer useful, as it includes the Java classes for Berkeley DB.
Ice for C#
IceCS-3.2.0.tar.gz
IceCS-3.2.0.zip
The complete Ice for C# source code.
Note that, to build Ice for C#, you must first compile Ice for C++ or, alternatively, download and install an appropriate binary distribution. This is necessary because the Slice-to-C# compiler is written in C++.
以上的3個(gè)文件,Ice-x.x.-VC80.msi是ICE在Windows平臺(tái)下的運(yùn)行時(shí)文件,包含了必需的庫文件,頭文件,和命令行工具。有關(guān)運(yùn)行時(shí)的介紹,以后的專題文章將一一介紹(隨項(xiàng)目進(jìn)度逐步介紹吧:P)。第3方庫,建議安裝,特別是用C++開發(fā)時(shí)。當(dāng)然,如果不使用C++,就不必安裝了。ICE for C#的包,是個(gè)源碼庫,包含了ICE for C#的實(shí)現(xiàn),實(shí)際上是封裝了.NET Framework與ICE運(yùn)行庫之間的交互,即.NET程序與C++程序的交互,會(huì)看到大量的平臺(tái)調(diào)用。如果起個(gè)更好的名字,也許稱之為“ICE for C# Provider/Wrapper"更好。
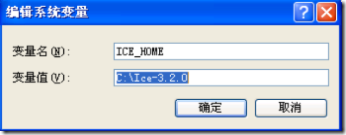
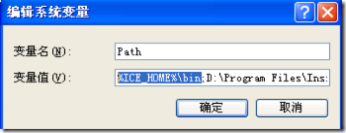
注意安裝運(yùn)行時(shí)后,需要添加環(huán)境變量ICE_HOME,并將%ICE_HOME%bin添加到Path中:
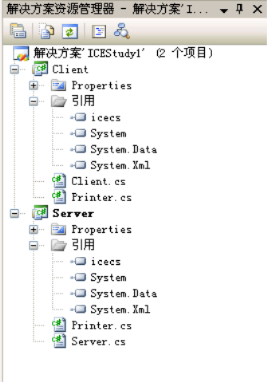
2、建立C#控制臺(tái)項(xiàng)目
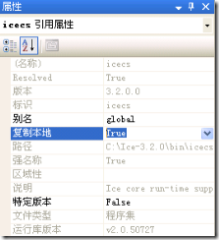
啟動(dòng)VS 2005,建立兩個(gè)控制臺(tái)項(xiàng)目,一個(gè)叫Server,一個(gè)叫Client。均添加對(duì)icecs.dll的引用。
由于我的ICE運(yùn)行時(shí)安裝于C:Ice-3.2.0,故在C:Ice-3.2.0bin下找到此文件,需要注意的是,一定要選擇:復(fù)制到本地。
3、定義接口方法
module Demo {
interface Printer {
void printString(string s);
};
};
將這段代碼存為:Printer.ice。在此文件同目錄下,創(chuàng)建批處理命令文件cmd1.bat,內(nèi)容如下:
																								mkdir generated
slice2cs --output-dir generated Printer.ice
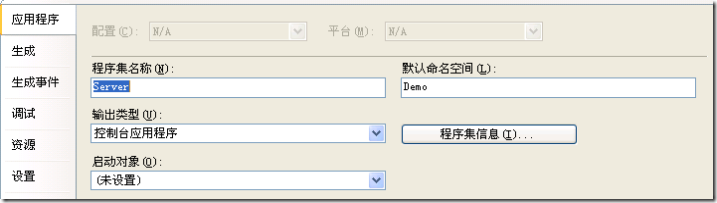
運(yùn)行cmd1.bat,則會(huì)在generated 文件夾下生成Printer.cs。這里暫時(shí)不分析Printer.cs的結(jié)構(gòu),直接使用它了。將Printer.cs拷貝到新建的兩個(gè)項(xiàng)目中,注意,你必須將項(xiàng)目中使用的namespace設(shè)置成相同的,例如,我將根namespace設(shè)置為Demo。

4、添加應(yīng)用邏輯
在Client項(xiàng)目中添加Client.cs,內(nèi)容如下:
																								using System;
using System.Collections.Generic;
using System.Text;
namespace Demo
{
publicclass Client
{
publicstaticvoid Main(string[] args)
{
int status = 0;
Ice.Communicator ic = null;
try
{
ic = Ice.Util.initialize(ref args);
Ice.ObjectPrx obj = ic.stringToProxy(
"SimplePrinter:tcp -p 12345:udp -p 12345");
PrinterPrx printer
= PrinterPrxHelper.checkedCast(obj);
if (printer == null)
thrownew ApplicationException("Invalid proxy");
printer.printString("Hello World!");
}
catch (Exception e)
{
Console.Error.WriteLine(e);
status = 1;
}
if (ic != null)
{
// Clean up//try
{
ic.destroy();
}
catch (Exception e)
{
Console.Error.WriteLine(e);
status = 1;
}
}
Environment.Exit(status);
}
}
}
在server項(xiàng)目中,添加Server.cs文件,內(nèi)容如下:
																								namespace Demo
{
using System;
publicclass PrinterI : Demo.PrinterDisp_
{
publicoverridevoid printString(string s, Ice.Current current)
{
Console.WriteLine(s);
}
}
publicclass Server
{
publicstaticvoid Main(string[] args)
{
int status = 0;
Ice.Communicator ic = null;
try
{
ic = Ice.Util.initialize(ref args);
Ice.ObjectAdapter adapter
= ic.createObjectAdapterWithEndpoints(
"SimplePrinter", "tcp -p 12345:udp -p 12345");
Ice.Object obj = new PrinterI();
adapter.add(
obj,
Ice.Util.stringToIdentity("SimplePrinter"));
adapter.activate();
ic.waitForShutdown();
}
catch (Exception e)
{
Console.Error.WriteLine(e);
status = 1;
}
if (ic != null)
{
// Clean up//try
{
ic.destroy();
}
catch (Exception e)
{
Console.Error.WriteLine(e);
status = 1;
}
}
Environment.Exit(status);
}
}
}
5、測試應(yīng)用
切換到Server項(xiàng)目的生成目錄,發(fā)現(xiàn)生成了server.exe程序,運(yùn)行:Server.exe。
如果你的OS安裝了網(wǎng)絡(luò)防火墻,注意開通相應(yīng)的12345端口。最好關(guān)閉所有防火墻軟件后,測試應(yīng)用程序。
server.exe運(yùn)行后,就一直處于監(jiān)聽狀態(tài)。運(yùn)行netstat -an,可以看到服務(wù)器端程序監(jiān)聽著12345端口。

在命令行下運(yùn)行Client.exe,會(huì)發(fā)現(xiàn)Server.exe的控制臺(tái)顯示:Hello Word!
注意事項(xiàng):
1、通信協(xié)議串請使用TCP或UDP,如以上所提供的那樣,ICE手冊中所給的協(xié)議是:"default -p 10000",這在我的平臺(tái)下并不可用,這需要給ICE配置默認(rèn)設(shè)置。ICE設(shè)置使用 【程序名.config】 文件來配置,下面給出一個(gè)例子:
#
# The client reads this property to create the reference to the
# "hello" object in the server.
#
Hello.Proxy=hello:tcp -p 10000:udp -p 10000:ssl -p 10001
#
# Warn about connection exceptions.
#
#Ice.Warn.Connections=1
#
# We want a faster ACM for this demo.
#
Ice.ACM.Client=10
#
# Network Tracing
#
# 0 = no network tracing
# 1 = trace connection establishment and closure
# 2 = like 1, but more detailed
# 3 = like 2, but also trace data transfer
#
#Ice.Trace.Network=1
#
# Protocol Tracing
#
# 0 = no protocol tracing
# 1 = trace protocol messages
#
#Ice.Trace.Protocol=1
#
# Security Tracing
#
# 0 = no security tracing
# 1 = trace messages
#
#IceSSL.Trace.Security=1
#
# SSL Configuration
#
Ice.Plugin.IceSSL=icesslcs, Version=3.2.0.0, Culture=neutral, PublicKeyToken=1f998c50fec78381:IceSSL.PluginFactory
IceSSL.DefaultDir=../../../certs
IceSSL.ImportCert.CurrentUser.Root=cacert.pem
IceSSL.CertFile=c_rsa1024.pfx
IceSSL.Password=password
Ice.ThreadPerConnection=1
2、關(guān)閉防護(hù)墻
當(dāng)不關(guān)閉防火墻時(shí),出現(xiàn)一些莫名其妙的問題,均是程序的TCP/IP出入受到了限制導(dǎo)致的。
后記:
最近項(xiàng)目使用了ICE來實(shí)現(xiàn)分布式應(yīng)用,ICE的確功能強(qiáng)大,希望使用過的朋友或?qū)CE關(guān)注的朋友能一起交流交流經(jīng)驗(yàn),彼此提高。【開源應(yīng)用技術(shù)群 25935569】 。