這不是一篇向?qū)В娴南驅(qū)д埧?a href="http://www.boost.org/doc/libs/1_42_0/more/getting_started/unix- variants.html">這里(http://goo.gl/XcAf)。
這僅是一篇筆記。這里用
bjam方式進(jìn)行編譯。
- 下載boost。(http://cdnetworks-kr-1.dl.sourceforge.net/project/boost/boost/1.42.0/boost_1_42_0.tar.bz2)
- 解壓到指定文件夾,我是將它解壓到根目錄下的一個(gè)sourcecode文件夾下。
/home/volnet/sourcecode/boost_1_42_0
- 啟動(dòng)終端(ctrl+f2,輸入“gnome-terminal”)。生成bjam腳本。
./bootstrap.sh --prefix=/home/volnet/sourcecode/boost_install
如果不帶--prefix參數(shù)的話(推薦),默認(rèn)的路徑是/usr/local/include和/usr/local/lib ./bootstrap.sh
使用--help參數(shù)可以查看幫助,用-h可以查看簡要幫助。 ./bootstrap.sh --help
生成腳本bjam,已經(jīng)存在的腳本將被自動(dòng)備份。volnet@Ubuntu:~/sourcecode/boost_1_42_0$ ./bootstrap.sh --prefix=/home/volnet/sourcecode/boost_install/
Building Boost.Jam with toolset gcc... tools/jam/src/bin.linuxx86/bjam
Detecting Python version... 2.6
Detecting Python root... /usr
Unicode/ICU support for Boost.Regex?... /usr
Backing up existing Boost.Build configuration in project-config.jam.4
Generating Boost.Build configuration in project-config.jam...
Bootstrapping is done. To build, run:
./bjam
To adjust configuration, edit 'project-config.jam'.
Further information:
- Command line help:
./bjam --help
- Getting started guide:
http://www.boost.org/more/getting_started/unix-variants.html
- Boost.Build documentation:
http://www.boost.org/boost-build2/doc/html/index.html
- 然后就是利用生成的bjam腳本編譯源碼了。
volnet@Ubuntu:~/sourcecode/boost_1_42_0$ sudo ./bjam -a -sHAVE_ICU=1 installNote: Building Boost.Regex with Unicode/ICU support enabled Using ICU in /usr/include
- ./是unix-like系統(tǒng)執(zhí)行文件的前綴,這里就是指要執(zhí)行bjam文件。
- -a是參數(shù),代表重新編譯(Rebuild)。輸入./bjam -h獲得更多幫助。
- -sHAVE_ICU=1,代表支持Unicode/ICU。點(diǎn)擊這里(http://goo.gl/ySEe)
前提:系統(tǒng)內(nèi)需要安裝有l(wèi)ibicu-dev,可以在終端輸入:
sudo apt-get install libicu-dev
- install,表示安裝
- --clean,表示清理。當(dāng)前語句中包含-a,則不需要先手動(dòng)清理,否則需要先運(yùn)行
./bjam --clean
- 如果你執(zhí)行上一步,會出現(xiàn)諸如:mpi的問題,多半是本機(jī)沒有安裝mpi。根據(jù)系統(tǒng)提示,你可以找到有/home/volnet/sourcecode/boost_1_42_0/tools/build/v2/user-config.jam。在文件最后跟上
using mpi ;
即可。然后如果還是有mpi問題,說明本機(jī)沒有安裝mpi。sudo apt-get install mpi-default-dev
界此應(yīng)該順利通過編譯了。并在/usr/local/lib下有了boost的庫了。
下面討論一下鏈接靜態(tài)鏈接庫在Eclipse里的問題。
在
Unix variants向?qū)Ю铮俜教峁┝艘粋€(gè)使用正則表達(dá)式的程序。
在Eclipse里,新增c++ project,并使用Linux C++編譯器。將代碼拷貝到文件中:
因?yàn)橐o態(tài)鏈接到正則表達(dá)式的庫,所以如下圖所示,設(shè)置對應(yīng)的*.a文件路徑到eclipse,以使鏈接器能夠找到它。
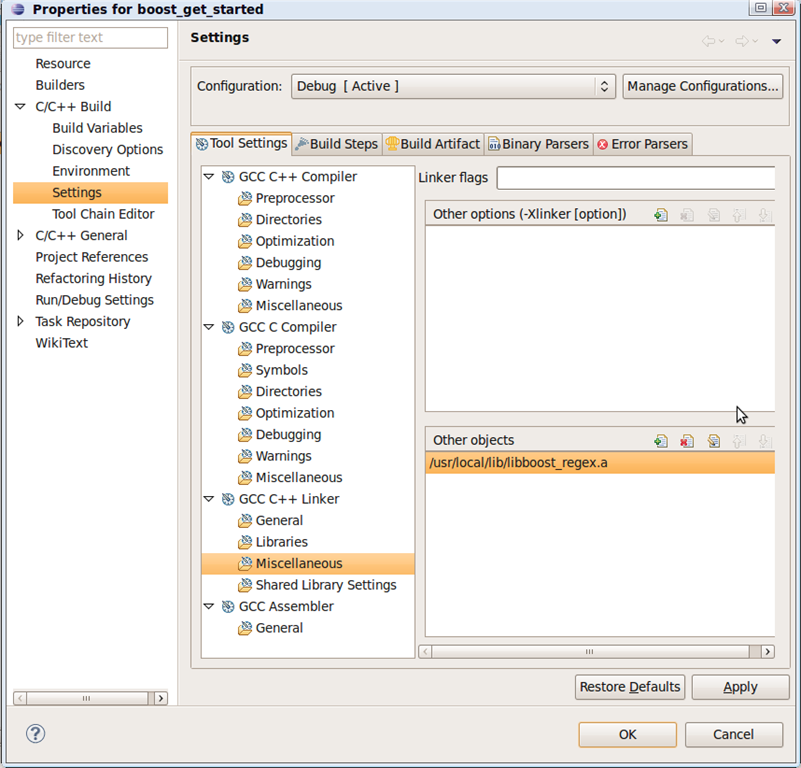
編譯通過!
為了我們的程序能夠正確載入,我們需要讓我們的程序在我們的系統(tǒng)范圍內(nèi)也能夠找到我們的庫。這時(shí)候我們需要在設(shè)置一下。詳見
這部分的相關(guān)介紹。
測試程序!
volnet@Ubuntu:~/workspace/boost_get_started/Debug$ ./boost_get_started < test
Will Success Spoil Rock Hunter?
這里test是一個(gè)文件。