|
|
作者簡(jiǎn)介: Eric Sink,SourceGear創(chuàng)始人,是Eric Sink on the Business of Software的作者。他還是AbiWord項(xiàng)目的發(fā)起者。在這之前,他在SpyGlass工作,領(lǐng)導(dǎo)瀏覽器開發(fā)工作,其代碼后來授權(quán)給了微軟并成為早期IE瀏覽器的基礎(chǔ)。 下面的文章來自Eric的個(gè)人blog。這是一個(gè)很有意思的系列文章,對(duì)于中國(guó)程序員來說,這也許是一個(gè)很多人感興趣,卻很少有人討論的領(lǐng)域。我計(jì)劃在今后以每周2篇的速度發(fā)出來。由于這也是我第一次翻譯東西,如果有人發(fā)現(xiàn)不對(duì)或不妥的地方還請(qǐng)指正。轉(zhuǎn)載請(qǐng)注明原作者和譯者。我的郵箱: iamzhutuo@gmail.com。 下面開始是正文了。 原文鏈接 技術(shù)工作者如何進(jìn)行市場(chǎng)營(yíng)銷本頁是我的系列文章《技術(shù)工作者如何進(jìn)行市場(chǎng)營(yíng)銷》的目錄,這個(gè)系列的中心思想是,如果我們不刻意去神秘化市場(chǎng)營(yíng)銷工作,技術(shù)工作者完全有能力勝任它。這是一個(gè)正在創(chuàng)作中的系列,新的內(nèi)容會(huì)在不久后添加進(jìn)來。 [譯者注:本文是2003年7月30日寫作的, 這個(gè)系列現(xiàn)在已經(jīng)完成了, 后面我會(huì)盡量把他們都翻譯出來.] 在很多小的獨(dú)立軟件開發(fā)公司里,很重要的一點(diǎn)是至少有一部分開發(fā)人員要懂得基本的市場(chǎng)營(yíng)銷知識(shí)。但是,由于缺乏創(chuàng)新能力和圖形設(shè)計(jì)的能力,很多技術(shù)工作者對(duì)市場(chǎng)營(yíng)銷工作有著逃避的情緒。但這些都不是判斷一個(gè)市場(chǎng)從業(yè)人員合格與否的決定性因素。市場(chǎng)營(yíng)銷的成功與否主要取決于策略,而非藝術(shù)設(shè)計(jì)。事實(shí)上,很多團(tuán)隊(duì)能夠提升市場(chǎng)營(yíng)銷水平,主要是因?yàn)樗麄兞私獾绞袌?chǎng)工作,就像軟件研發(fā)一樣,有兩個(gè)完全不同的階段。 市場(chǎng)營(yíng)銷的兩個(gè)階段 當(dāng)我們開發(fā)一款軟件,我們通常會(huì)有設(shè)計(jì)階段,以及隨后的實(shí)施階段。在設(shè)計(jì)階段,我們仔細(xì)評(píng)估我們想要做的是什么;在實(shí)現(xiàn)階段,我們按需求完成它。 同樣的,市場(chǎng)營(yíng)銷有一個(gè)策劃階段,和一個(gè)傳播階段。
- 策劃階段類似軟件研發(fā)中的設(shè)計(jì)階段。(事實(shí)上,它們是相關(guān)而且通常必須共同完成的。)
傳播階段類似于軟件研發(fā)的實(shí)現(xiàn)階段。我們稱這一系列的活動(dòng)為“營(yíng)銷傳播”,或者簡(jiǎn)稱為"marcomm"。
一個(gè)有趣的事實(shí)是,盡管市場(chǎng)工作者和軟件開發(fā)人員通常認(rèn)為彼此沒什么共同點(diǎn),這兩個(gè)團(tuán)隊(duì)都會(huì)自然地試圖跳過它們的第一階段。標(biāo)新立異的程序員們不想寫需求和設(shè)計(jì)文檔。他們只想直接開始寫代碼。類似地,市場(chǎng)工作者也傾向于一頭扎進(jìn)寫宣傳文案,做廣告宣傳等工作。在這兩者中,跳過第一階段會(huì)為你帶來立竿見影的工作成果,但是你會(huì)在接下來的工作中遇到形形色色的問題。 關(guān)于策略的文章:浸信會(huì)和邊界 (2007.1.19)在我住的小區(qū)里,所有的人都需要至少300英尺深的一口井。根據(jù)這一事實(shí),我推斷這個(gè)區(qū)域內(nèi)鉆井業(yè)將會(huì)有很好的前途。但是,城市的供水系統(tǒng)就在3英里之外。這個(gè)例子看上去很蠢,但是在這個(gè)時(shí)候,很多公司都在根據(jù)類似的邏輯寫著他們的商業(yè)計(jì)劃。
怎樣讓人們都談?wù)撃愕漠a(chǎn)品(2006.8.24)口口相傳不是一種策略,它是策略的結(jié)果。我們?nèi)绾问怪蔀楝F(xiàn)實(shí)?
游戲變得不對(duì)勁了(2005.7.12)我們都理解編程中的深度抽象和面向?qū)ο蟆N覀円捕寄苊靼滋摂M內(nèi)存是如何工作的。我們當(dāng)中還有些人能記住vi里如何搜索和替換。但是當(dāng)技術(shù)宅們開始談?wù)撊绾问袌?chǎng)中什么樣的軟件才有競(jìng)爭(zhēng)力時(shí),通常看起來很有頭腦的我們就變得像帕里斯希爾頓一樣了。我們就是不明白這一點(diǎn)。技術(shù)工作者對(duì)市場(chǎng)營(yíng)銷工作的理解就像男人對(duì)女人的理解一樣。
技術(shù)工作者的心理障礙 (2003.8.7)想要接觸主流的消費(fèi)者,有些時(shí)候我們需要忽略我們個(gè)人的喜好,而去做真正的消費(fèi)者們想做的。市場(chǎng)營(yíng)銷工作中的非技術(shù)人員能很好的做到這一點(diǎn)。一旦他們確定了市場(chǎng)需要的是什么,他們就會(huì)全力以赴把這樣的產(chǎn)品送到消費(fèi)者手中。他們不會(huì)對(duì)實(shí)現(xiàn)它的技術(shù)有任何看法,也就能毫不費(fèi)力地區(qū)分消費(fèi)者的需求和自己的喜好。
在產(chǎn)品生命周期中的每一步,做好該做的事(2003.7.9)但是第三步是無論如何都會(huì)發(fā)生在你的產(chǎn)品上的。就像是正常人類所必然經(jīng)歷的老化過程,我們的產(chǎn)品也會(huì)經(jīng)歷生命周期中的各個(gè)階段。唯一能避免進(jìn)行到下一階段的方式就是死亡,所以我們必須優(yōu)雅的面對(duì)這些階段。
市場(chǎng)營(yíng)銷不是預(yù)處理 (2003.6.6)“市場(chǎng)營(yíng)銷不僅僅是向整個(gè)世界介紹你的產(chǎn)品。市場(chǎng)營(yíng)銷還包括產(chǎn)品特性的確定。你需要設(shè)計(jì)并開發(fā)出符合預(yù)期市場(chǎng)定位的產(chǎn)品”
選擇你的對(duì)手 (2003.4.4)很重要的一點(diǎn)就是選擇你期望的競(jìng)爭(zhēng)對(duì)手。我喜歡Jim Barksdale的選擇競(jìng)爭(zhēng)對(duì)手的哲學(xué):選一個(gè)“大而蠢”的對(duì)手。
關(guān)于“Marcomm” 的文章參加一個(gè)貿(mào)易展 (2004.5.28)貿(mào)易展是我個(gè)人最喜愛的“marcomm”工具,因?yàn)樗腔?dòng)的。廣告和PR是你向你的客戶單向的投放,信息沒有機(jī)會(huì)從對(duì)方流向你。其他的marcomm工具也各有各的用途,但是沒有像貿(mào)易展一樣有效的。
小獨(dú)立軟件開發(fā)商的雜志廣告指南 (2003.5.1)對(duì)小的獨(dú)立開發(fā)商來說,登廣告不是一個(gè)合理使用資金的途徑。舉例來說,在主流軟件開發(fā)雜志上登一個(gè)整版彩頁的廣告可能會(huì)花掉超過10000美元。你要賣掉多少份軟件才能付得起廣告的費(fèi)用?老實(shí)說,買10000張彩票都可能是更好的投資選擇。
http://www.zhihu.com/question/19931404 http://wenku.baidu.com/view/78898a1fa76e58fafab00377.html
http://www.cnblogs.com/xiaoxuanzi/tag/%E7%B2%BE%E9%80%9Agit/
%a 浮點(diǎn)數(shù)、十六進(jìn)制數(shù)字和p-記數(shù)法(C99)
%A 浮點(diǎn)數(shù)、十六進(jìn)制數(shù)字和p-記法(C99)
%c 一個(gè)字符
%d 有符號(hào)十進(jìn)制整數(shù)
%e 浮點(diǎn)數(shù)、e-記數(shù)法
%E 浮點(diǎn)數(shù)、E-記數(shù)法
%f 浮點(diǎn)數(shù)、十進(jìn)制記數(shù)法
%g 根據(jù)數(shù)值不同自動(dòng)選擇%f或%e.
%G 根據(jù)數(shù)值不同自動(dòng)選擇%f或%e.
%i 有符號(hào)十進(jìn)制數(shù)(與%d相同)
%o 無符號(hào)八進(jìn)制整數(shù)
%p 指針
%s 字符串
%u 無符號(hào)十進(jìn)制整數(shù)
%x 使用十六進(jìn)制數(shù)字0f的無符號(hào)十六進(jìn)制整數(shù)
%X 使用十六進(jìn)制數(shù)字0f的無符號(hào)十六進(jìn)制整數(shù)
%% 打印一個(gè)百分號(hào)
Posted by Matthew E under Code Editors, Productivity, Programming, SlickEdit Products [3] Comments Whenever we’re putting together marketing materials, advertising copy, checklists of features to demo at trade shows, etc, a common start of the conversation is “What are the top features of SlickEdit”. Feature lists are all well and good, but just because we think a feature makes a Top Ten list doesn’t mean it resonates with every user. And features are usually spoken of in broad brush strokes, like “Version Control Integration” or “Configurable Keyboard Emulations”. But what really makes your editor an indispensable tool is the collection of small features and tricks that you use every day. And there is no Top Ten list that covers this, as everyone’s list is different. We did a quick poll around the office to gather up some of the features that we use all the time. And yes, everyone’s list was quite different. So in no particular order, here are a few of our favorite things in SlickEdit. Italic bold below denotes a Slick-C command, like complete-next, which can be executed from the SlickEdit command line or bound to a keyboard shortcut. complete-next and complete-prev Bound to Ctrl+Shift+> and Ctrl+Shift+< in most emulations. This searches for prefix matches in your current document. Very handy for completing words when you’re working in plain text or in a file format where Context Tagging is not able to provide symbol matches, or when you want to pick up non-symbol matches, like words found inside comments. where-is, what-is, and bind-to-key For those of you who like to keep your hands on the keyboard as much as possible, you need this. Sure this information is available on the menus and in the Options dialog, but why mouse around? Entering where-is on the SlickEdit command line will allow you to enter a Slick-C command to see if there’s a keyboard shortcut defined for it, while what-is lets you see the command name for a shortcut, or check if it’s free. Use bind-to-key to define a shortcut for something that’s currently not bound to one. Aliases with %\n If we had to list which features of SlickEdit we feel are underutilized outside our office walls, Aliases would be at the top of every list. Aliases simply allow you to type a short sequence which will be expanded, which is great for frequently used boilerplate text. They can be defined globally or on a per-language basis. We do provide some aliases out-of-the-box, but the real power is in creating your own. Go to the Tools > Options dialog, and search for “Aliases” to see where you can define them. A common usage is generating “Caveman Debugging” statements. Here’s a sample alias for C. printf(" %\n: %\c \n"); The SlickEdit alias facility has several escape sequences, and %\n is the sequence for “current function name”, and %\c positions the cursor for editing after the text expansion is made. toggle-comment This feature originated as a macro written by one of our customers, which he shared on our community forums. It was so popular that we made it part of the product. It’s a great complement to comment-lines and comment-block. Quick replacements from the command line Doing a quick search and replace inside the current file is a snap using the c/old/new/ syntax on the command line. Even more power comes from using command modifiers after the trailing slash. For example, the ‘m’ modifier means ‘mark’ (our term for current selection), and ‘*’ means globally without confirmation prompting. So to change all instances of char to wchar_t in your current selection without a prompt, you would enter c/char/wchar_t/m* on the command line, and you’re done. svc-diff-with-tip This is a super-quick way to compare your current file with the most recent version in version control, bypassing the version control history dialog. This currently supports CVS, Subversion, and Git. And if you’re using Subversion, and not currently able to connect to the repository, svn-diff-with-base performs a comparison with the ‘clean’ copy from your most recent update. svn-get-annotated-buffer and cvs-get-annotated-buffer A wrapper around the “blame” command for CVS and Subversion. Warning: May be habit-forming. list-buffers and project-load These bring up the Files tool window. Stop right there! You’re about to skip past this one because the word “Files” is pretty plain, and “bring up the Files tool window” sounds pretty dull. Do yourself a favor and try them out, and perhaps set up keyboard bindings for them. list-buffers will show you a searchable list of all the files you currently have open, allowing you to quickly switch to one without having to search through file tabs. Handy if you tend to leave a lot of files open in the editor. If you have a project open, the Project and Workspace tabs of the Files window allow you to find any file and open it from there. Very helpful for large projects. Vim cursor keys I hesitated to include this one initially. It’s not specific to SlickEdit, of course, and is only one of the 15 keyboard emulations we define. But if you’re a vi/vim adherent, having a high fidelity vim emulation built into your IDE is a big deal. It allows you to get all the benefits of the tools and features built into the environment without having to rewire you brain when you actually need to edit code. If you’ve ever accidently typed a stray ‘j’, ‘h’, or ‘dd’ or into an instant messaging client, you know exactly what I mean. What feature(s) is/are highest on your list?
http://feeds.feedburner.com/helloWorld-TheSlickeditDeveloperBlog
- Alt + Enter -- 全屏
- Alt + B --打開新的連接
- Alt + 1/2/3/4/5.../9 -- 切換到第1/2/3/4/5.../9個(gè)標(biāo)簽
-
- Ctrl + A -- 光標(biāo)移至行首。
- Ctrl + B -- 光標(biāo)前移1個(gè)字符
- Ctrl + D -- 刪除光標(biāo)后1個(gè)字符
- Ctrl + E -- 光標(biāo)移至行末
- Ctrl + F -- 光標(biāo)后移1個(gè)字符
- Ctrl + H -- 刪除光標(biāo)前的1個(gè)字符
- Ctrl + J -- 回車
- Ctrl + k -- 刪除當(dāng)前光標(biāo)至行末的字符
- Ctrl + P -- 顯示前一條命令
- Ctrl + M -- 回車
- Ctrl + N -- 下一條命令
- Ctrl + T -- 交換光標(biāo)前最后兩個(gè)字符(思科路由器可用)
- Ctrl + U -- 清除當(dāng)前行和緩存的輸入
- Ctrl + V -- 輸入ctrl字符
- Ctrl + W -- 刪除當(dāng)前光標(biāo)至行首的字符
二、實(shí)驗(yàn)平臺(tái) Linux操作系統(tǒng) 三、實(shí)驗(yàn)內(nèi)容 編寫Linux下TCP服務(wù)器套接字程序,程序運(yùn)行時(shí)服務(wù)器等待客戶的連接,一旦連接成功,則顯示客戶的IP地址、端口號(hào),并向客戶端發(fā)送字符串。 四、實(shí)驗(yàn)原理 使用TCP套接字編程可以實(shí)現(xiàn)基于TCP/IP協(xié)議的面向連接的通信,它分為服務(wù)器端和客戶端兩部分,其主要實(shí)現(xiàn)過程如圖1.1所示。 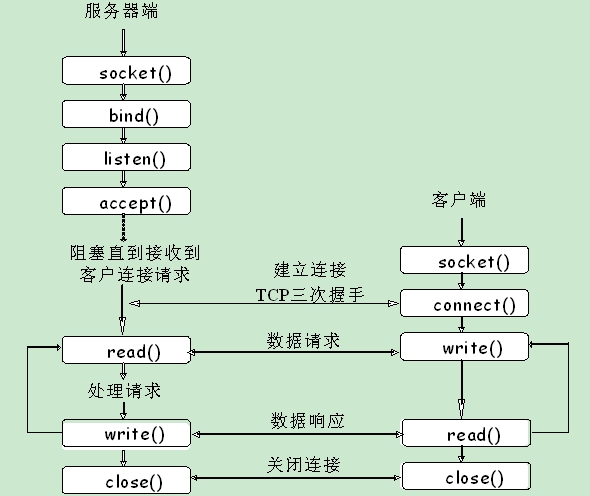
圖1.1 TCP客戶/服務(wù)器的套接字函數(shù) 1、socket函數(shù):為了執(zhí)行網(wǎng)絡(luò)輸入輸出,一個(gè)進(jìn)程必須做的第一件事就是調(diào)用socket函數(shù)獲得一個(gè)文件描述符。 -----------------------------------------------------------------
#include <sys/socket.h>
int socket(int family,int type,int protocol);
返回:非負(fù)描述字---成功 -1---失敗
----------------------------------------------------------------- |
第一個(gè)參數(shù)指明了協(xié)議簇,目前支持5種協(xié)議簇,最常用的有AF_INET(IPv4協(xié)議)和AF_INET6(IPv6協(xié)議);第二個(gè)參數(shù)指明套接口類型,有三種類型可選:SOCK_STREAM(字節(jié)流套接口)、SOCK_DGRAM(數(shù)據(jù)報(bào)套接口)和SOCK_RAW(原始套接口);如果套接口類型不是原始套接口,那么第三個(gè)參數(shù)就為0。 2、connect函數(shù):當(dāng)用socket建立了套接口后,可以調(diào)用connect為這個(gè)套接字指明遠(yuǎn)程端的地址;如果是字節(jié)流套接口,connect就使用三次握手建立一個(gè)連接;如果是數(shù)據(jù)報(bào)套接口,connect僅指明遠(yuǎn)程端地址,而不向它發(fā)送任何數(shù)據(jù)。 -----------------------------------------------------------------
#include <sys/socket.h>
int connect(int sockfd, const struct sockaddr * addr, socklen_t addrlen);
返回:0---成功 -1---失敗
----------------------------------------------------------------- |
第一個(gè)參數(shù)是socket函數(shù)返回的套接口描述字;第二和第三個(gè)參數(shù)分別是一個(gè)指向套接口地址結(jié)構(gòu)的指針和該結(jié)構(gòu)的大小。 這些地址結(jié)構(gòu)的名字均已“sockaddr_”開頭,并以對(duì)應(yīng)每個(gè)協(xié)議族的唯一后綴結(jié)束。以IPv4套接口地址結(jié)構(gòu)為例,它以“sockaddr_in”命名,定義在頭文件<netinet/in.h>;以下是結(jié)構(gòu)體的內(nèi)容: ------------------------------------------------------------------
struct in_addr {
in_addr_t s_addr; /* IPv4地址 */
};
struct sockaddr_in {
uint8_t sin_len; /* 無符號(hào)的8位整數(shù) */
sa_family_t sin_family;
/* 套接口地址結(jié)構(gòu)的地址簇,這里為AF_INET */
in_port_t sin_port; /* TCP或UDP端口 */
struct in_addr sin_addr;
char sin_zero[8]; };
------------------------------------------------------------------- |
3、bind函數(shù):為套接口分配一個(gè)本地IP和協(xié)議端口,對(duì)于網(wǎng)際協(xié)議,協(xié)議地址是32位IPv4地址或128位IPv6地址與16位的TCP或UDP端口號(hào)的組合;如指定端口為0,調(diào)用bind時(shí)內(nèi)核將選擇一個(gè)臨時(shí)端口,如果指定一個(gè)通配IP地址,則要等到建立連接后內(nèi)核才選擇一個(gè)本地IP地址。 -------------------------------------------------------------------
#include <sys/socket.h>
int bind(int sockfd, const struct sockaddr * server, socklen_t addrlen);
返回:0---成功 -1---失敗
------------------------------------------------------------------- |
第一個(gè)參數(shù)是socket函數(shù)返回的套接口描述字;第二和第第三個(gè)參數(shù)分別是一個(gè)指向特定于協(xié)議的地址結(jié)構(gòu)的指針和該地址結(jié)構(gòu)的長(zhǎng)度。 4、listen函數(shù):listen函數(shù)僅被TCP服務(wù)器調(diào)用,它的作用是將用sock創(chuàng)建的主動(dòng)套接口轉(zhuǎn)換成被動(dòng)套接口,并等待來自客戶端的連接請(qǐng)求。 -------------------------------------------------------------------
#include <sys/socket.h>
int listen(int sockfd,int backlog);
返回:0---成功 -1---失敗
------------------------------------------------------------------- |
第一個(gè)參數(shù)是socket函數(shù)返回的套接口描述字;第二個(gè)參數(shù)規(guī)定了內(nèi)核為此套接口排隊(duì)的最大連接個(gè)數(shù)。由于listen函數(shù)第二個(gè)參數(shù)的原因,內(nèi)核要維護(hù)兩個(gè)隊(duì)列:以完成連接隊(duì)列和未完成連接隊(duì)列。未完成隊(duì)列中存放的是TCP連接的三路握手為完成的連接,accept函數(shù)是從以連接隊(duì)列中取連接返回給進(jìn)程;當(dāng)以連接隊(duì)列為空時(shí),進(jìn)程將進(jìn)入睡眠狀態(tài)。 5、accept函數(shù):accept函數(shù)由TCP服務(wù)器調(diào)用,從已完成連接隊(duì)列頭返回一個(gè)已完成連接,如果完成連接隊(duì)列為空,則進(jìn)程進(jìn)入睡眠狀態(tài)。 -------------------------------------------------------------------
#include <sys/socket.h>
int accept(int listenfd, struct sockaddr *client, socklen_t * addrlen);
回:非負(fù)描述字---成功 -1---失敗
------------------------------------------------------------------- |
第一個(gè)參數(shù)是socket函數(shù)返回的套接口描述字;第二個(gè)和第三個(gè)參數(shù)分別是一個(gè)指向連接方的套接口地址結(jié)構(gòu)和該地址結(jié)構(gòu)的長(zhǎng)度;該函數(shù)返回的是一個(gè)全新的套接口描述字;如果對(duì)客戶段的信息不感興趣,可以將第二和第三個(gè)參數(shù)置為空。 6、write和read函數(shù):當(dāng)服務(wù)器和客戶端的連接建立起來后,就可以進(jìn)行數(shù)據(jù)傳輸了,服務(wù)器和客戶端用各自的套接字描述符進(jìn)行讀/寫操作。因?yàn)樘捉幼置枋龇彩且环N文件描述符,所以可以用文件讀/寫函數(shù)write()和read()進(jìn)行接收和發(fā)送操作。 (1)write()函數(shù)用于數(shù)據(jù)的發(fā)送。 -------------------------------------------------------------------
#include <unistd.h>
int write(int sockfd, char *buf, int len);
回:非負(fù)---成功 -1---失敗
------------------------------------------------------------------- 參數(shù)sockfd是套接字描述符,對(duì)于服務(wù)器是accept()函數(shù)返回的已連接套接字描述符,對(duì)于客戶端是調(diào)用socket()函數(shù)返回的套接字描述符;參數(shù)buf是指向一個(gè)用于發(fā)送信息的數(shù)據(jù)緩沖區(qū);len指明傳送數(shù)據(jù)緩沖區(qū)的大小。 (2)read()函數(shù)用于數(shù)據(jù)的接收。 -------------------------------------------------------------------
#include <unistd.h>
int read(int sockfd, char *buf, intlen);
回:非負(fù)---成功 -1---失敗
------------------------------------------------------------------- 參數(shù)sockfd是套接字描述符,對(duì)于服務(wù)器是accept()函數(shù)返回的已連接套接字描述符,對(duì)于客戶端是調(diào)用socket()函數(shù)返回的套接字描述符;參數(shù)buf是指向一個(gè)用于接收信息的數(shù)據(jù)緩沖區(qū);len指明接收數(shù)據(jù)緩沖區(qū)的大小。 7、send和recv函數(shù):TCP套接字提供了send()和recv()函數(shù),用來發(fā)送和接收操作。這兩個(gè)函數(shù)與write()和read()函數(shù)很相似,只是多了一個(gè)附加的參數(shù)。 (1)send()函數(shù)用于數(shù)據(jù)的發(fā)送。 -------------------------------------------------------------------
#include <sys/types.h>
#include < sys/socket.h >
ssize_t send(int sockfd, const void *buf, size_t len, int flags);
回:返回寫出的字節(jié)數(shù)---成功 -1---失敗
------------------------------------------------------------------- 前3個(gè)參數(shù)與write()相同,參數(shù)flags是傳輸控制標(biāo)志。 (2)recv()函數(shù)用于數(shù)據(jù)的發(fā)送。 -------------------------------------------------------------------
#include <sys/types.h>
#include < sys/socket.h >
ssize_t recv(int sockfd, void *buf, size_t len, int flags);
回:返回讀入的字節(jié)數(shù)---成功 -1---失敗
------------------------------------------------------------------- 前3個(gè)參數(shù)與read()相同,參數(shù)flags是傳輸控制標(biāo)志。 五、實(shí)驗(yàn)步驟 1、登陸進(jìn)入ubuntu操作系統(tǒng),新建一個(gè)文件,命名為tcpserver.c(為了方便起見,可以進(jìn)入“home”,再進(jìn)入用戶目錄,在用戶目錄下新建tcpserver.c)。 2、在tcpserver.c中編寫服務(wù)器端程序代碼并保存。 3、在“終端”(“Applications”→“附件”→“終端”)中執(zhí)行命令進(jìn)入tcpserver.c所在目錄。(pwd命令可以顯示當(dāng)前所在目錄;ls命令可以顯示當(dāng)前目錄下的文件和文件夾信息;cd..命令可以進(jìn)入上一級(jí)目錄;cd 目錄名 命令可以進(jìn)入當(dāng)前所示的某個(gè)目錄。) 4、執(zhí)行命令gcc –o tcpserver tcpserver.c生成可執(zhí)行文件tcpserver。 5、執(zhí)行命令./ tcpserver,觀察結(jié)果。 6、認(rèn)真分析源代碼,體會(huì)如何編寫一個(gè)TCP服務(wù)器端程序。 六、參考程序(tcpserver.c) - #include <stdio.h>
- #include <stdlib.h>
- #include <string.h>
- #include <unistd.h>
- #include <sys/types.h>
- #include <sys/socket.h>
- #include <netinet/in.h>
- #include <arpa/inet.h>
-
- #define PORT 1234
- #define BACKLOG 1
-
- int main()
- {
- int listenfd, connectfd;
- struct sockaddr_in server;
- struct sockaddr_in client;
- socklen_t addrlen;
- if((listenfd = socket(AF_INET, SOCK_STREAM, 0)) == -1)
- {
- perror("Creating socket failed.");
- exit(1);
- }
- int opt =SO_REUSEADDR;
- setsockopt(listenfd,SOL_SOCKET, SO_REUSEADDR, &opt, sizeof(opt));
- bzero(&server,sizeof(server));
- server.sin_family=AF_INET;
- server.sin_port=htons(PORT);
- server.sin_addr.s_addr= htonl (INADDR_ANY);
- if(bind(listenfd, (struct sockaddr *)&server, sizeof(server)) == -1) {
- perror("Binderror.");
- exit(1);
- }
- if(listen(listenfd,BACKLOG)== -1){ /* calls listen() */
- perror("listen()error\n");
- exit(1);
- }
- addrlen =sizeof(client);
- if((connectfd = accept(listenfd,(struct sockaddr*)&client,&addrlen))==-1) {
- perror("accept()error\n");
- exit(1);
- }
- printf("Yougot a connection from cient's ip is %s, prot is %d\n",inet_ntoa(client.sin_addr),htons(client.sin_port));
- send(connectfd,"Welcometo my server.\n",22,0);
- close(connectfd);
- close(listenfd);
- return 0;
- }
一、實(shí)驗(yàn)?zāi)康?/strong> 學(xué)習(xí)和掌握Linux下的TCP客戶端基本原理和基本編程方法。 二、實(shí)驗(yàn)平臺(tái) Linux操作系統(tǒng) 三、實(shí)驗(yàn)內(nèi)容 編寫Linux下TCP客戶端套接字程序,結(jié)合實(shí)驗(yàn)一的服務(wù)器端程序,實(shí)現(xiàn)以下功能: 1、客戶根據(jù)用戶提供的IP地址連接到相應(yīng)的服務(wù)器; 2、服務(wù)器等待客戶的連接,一旦連接成功,則顯示客戶的IP地址、端口號(hào),并向客戶端發(fā)送字符串; 3、客戶接收服務(wù)器發(fā)送的信息并顯示。 四、實(shí)驗(yàn)原理 見實(shí)驗(yàn)一的實(shí)驗(yàn)原理部分。 五、實(shí)驗(yàn)步驟 1、登陸進(jìn)入ubuntu操作系統(tǒng),新建一個(gè)文件,命名為tcpclient.c(為了方便起見,可以進(jìn)入“home”,再進(jìn)入用戶目錄,在用戶目錄下新建tcpclient.c)。 2、在tcpclient.c中編寫客戶端程序代碼并保存。將實(shí)驗(yàn)一完成的tcpserver.c拷貝到與tcpclient.c同一目錄下。 3、在“終端”(“Applications”→“附件”→“終端”)中執(zhí)行命令進(jìn)入tcpserver.c和tcpclient.c所在目錄。 4、執(zhí)行命令gcc –o tcpserver tcpserver.c生成可執(zhí)行文件tcpserver。 5、執(zhí)行命令./ tcpserver。 6、再開一個(gè)“終端”,進(jìn)入tcpserver.c和tcpclient.c所在目錄,執(zhí)行命令 gcc–o tcpclient tcpclient.c生成可執(zhí)行文件tcpclient。 7、執(zhí)行命令./ tcpclient 127.0.0.1。 8、觀察兩個(gè)“終端”出現(xiàn)的結(jié)果。 9、認(rèn)真分析源代碼,體會(huì)如何編寫一個(gè)TCP客戶端程序。 六、參考程序(tcpclient.c) - #include<stdio.h>
- #include <stdlib.h>
- #include<unistd.h>
- #include<string.h>
- #include<sys/types.h>
- #include<sys/socket.h>
- #include<netinet/in.h>
- #include<netdb.h>
-
- #define PORT 1234
- #define MAXDATASIZE 100
-
- int main(int argc, char *argv[])
- {
- int sockfd, num;
- char buf[MAXDATASIZE];
- struct hostent *he;
- struct sockaddr_in server;
- if (argc!=2) {
- printf("Usage:%s <IP Address>\n",argv[0]);
- exit(1);
- }
- if((he=gethostbyname(argv[1]))==NULL){
- printf("gethostbyname()error\n");
- exit(1);
- }
- if((sockfd=socket(AF_INET, SOCK_STREAM, 0))==-1){
- printf("socket()error\n");
- exit(1);
- }
- bzero(&server,sizeof(server));
- server.sin_family= AF_INET;
- server.sin_port = htons(PORT);
- server.sin_addr =*((struct in_addr *)he->h_addr);
- if(connect(sockfd,(struct sockaddr *)&server,sizeof(server))==-1){
- printf("connect()error\n");
- exit(1);
- }
- if((num=recv(sockfd,buf,MAXDATASIZE,0)) == -1){
- printf("recv() error\n");
- exit(1);
- }
- buf[num-1]='\0';
- printf("Server Message: %s\n",buf);
- close(sockfd);
- return 0;
- }
-
實(shí)驗(yàn)結(jié)果: 

二、實(shí)驗(yàn)平臺(tái) ubuntu-8.04操作系統(tǒng) 三、實(shí)驗(yàn)內(nèi)容 編寫Linux下UDP服務(wù)器套接字程序,服務(wù)器接收客戶端發(fā)送的信息并顯示,同時(shí)顯示客戶的IP地址、端口號(hào),并向客戶端發(fā)送信息。如果服務(wù)器接收的客戶信息為“bye”,則退出循環(huán),并關(guān)閉套接字。 四、實(shí)驗(yàn)原理 UDP套接口是無連接的、不可靠的數(shù)據(jù)報(bào)協(xié)議;既然他不可靠為什么還要用呢?其一:當(dāng)應(yīng)用程序使用廣播或多播時(shí)只能使用UDP協(xié)議;其二:由于他是無連接的,所以速度快。因?yàn)閁DP套接口是無連接的,如果一方的數(shù)據(jù)報(bào)丟失,那另一方將無限等待,解決辦法是設(shè)置一個(gè)超時(shí)。 建立UDP套接口時(shí)socket函數(shù)的第二個(gè)參數(shù)應(yīng)該是SOCK_DGRAM,說明是建立一個(gè)UDP套接口;由于UDP是無連接的,所以服務(wù)器端并不需要listen或accept函數(shù)。 使用UDP套接字編程可以實(shí)現(xiàn)基于TCP/IP協(xié)議的面向無連接的通信,它分為服務(wù)器端和客戶端兩部分,其主要實(shí)現(xiàn)過程如圖3.1所示。
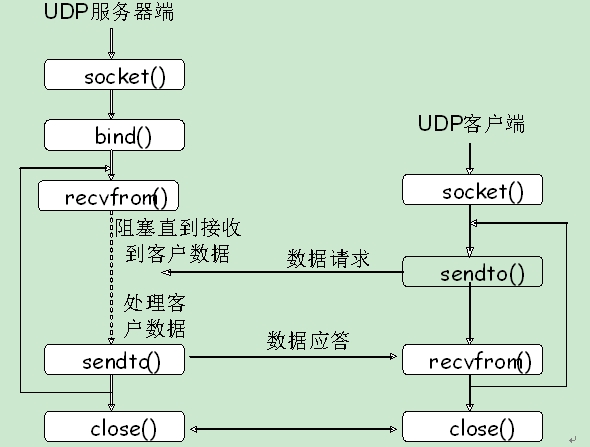
圖3.1 UDP客戶/服務(wù)器的套接字函數(shù)
1、socket函數(shù):為了執(zhí)行網(wǎng)絡(luò)輸入輸出,一個(gè)進(jìn)程必須做的第一件事就是調(diào)用socket函數(shù)獲得一個(gè)文件描述符。 -----------------------------------------------------------------
#include <sys/socket.h>
int socket(int family,int type,int protocol);
返回:非負(fù)描述字---成功 -1---失敗
----------------------------------------------------------------- |
第一個(gè)參數(shù)指明了協(xié)議簇,目前支持5種協(xié)議簇,最常用的有AF_INET(IPv4協(xié)議)和AF_INET6(IPv6協(xié)議);第二個(gè)參數(shù)指明套接口類型,有三種類型可選:SOCK_STREAM(字節(jié)流套接口)、SOCK_DGRAM(數(shù)據(jù)報(bào)套接口)和SOCK_RAW(原始套接口);如果套接口類型不是原始套接口,那么第三個(gè)參數(shù)就為0。
2、bind函數(shù):為套接口分配一個(gè)本地IP和協(xié)議端口,對(duì)于網(wǎng)際協(xié)議,協(xié)議地址是32位IPv4地址或128位IPv6地址與16位的TCP或UDP端口號(hào)的組合;如指定端口為0,調(diào)用bind時(shí)內(nèi)核將選擇一個(gè)臨時(shí)端口,如果指定一個(gè)通配IP地址,則要等到建立連接后內(nèi)核才選擇一個(gè)本地IP地址。 -------------------------------------------------------------------
#include <sys/socket.h>
int bind(int sockfd, const struct sockaddr * server, socklen_t addrlen);
返回:0---成功 -1---失敗
------------------------------------------------------------------- |
第一個(gè)參數(shù)是socket函數(shù)返回的套接口描述字;第二和第第三個(gè)參數(shù)分別是一個(gè)指向特定于協(xié)議的地址結(jié)構(gòu)的指針和該地址結(jié)構(gòu)的長(zhǎng)度。
3、recvfrom函數(shù):UDP使用recvfrom()函數(shù)接收數(shù)據(jù),他類似于標(biāo)準(zhǔn)的read(),但是在recvfrom()函數(shù)中要指明目的地址。 -------------------------------------------------------------------
#include <sys/types.h>
#include <sys/socket.h>
ssize_t recvfrom(int sockfd, void *buf, size_t len, int flags, struct sockaddr * from, size_t *addrlen);
返回接收到數(shù)據(jù)的長(zhǎng)度---成功 -1---失敗
------------------------------------------------------------------- |
前三個(gè)參數(shù)等同于函數(shù)read()的前三個(gè)參數(shù),flags參數(shù)是傳輸控制標(biāo)志。最后兩個(gè)參數(shù)類似于accept的最后兩個(gè)參數(shù)。
4、sendto函數(shù):UDP使用sendto()函數(shù)發(fā)送數(shù)據(jù),他類似于標(biāo)準(zhǔn)的write(),但是在sendto()函數(shù)中要指明目的地址。 -------------------------------------------------------------------
#include <sys/types.h>
#include <sys/socket.h>
ssize_t sendto(int sockfd, const void *buf, size_t len, int flags, const struct sockaddr * to, int addrlen);
返回發(fā)送數(shù)據(jù)的長(zhǎng)度---成功 -1---失敗
------------------------------------------------------------------- |
前三個(gè)參數(shù)等同于函數(shù)read()的前三個(gè)參數(shù),flags參數(shù)是傳輸控制標(biāo)志。參數(shù)to指明數(shù)據(jù)將發(fā)往的協(xié)議地址,他的大小由addrlen參數(shù)來指定。
五、實(shí)驗(yàn)步驟 1、登陸進(jìn)入ubuntu操作系統(tǒng),新建一個(gè)文件,命名為udpserver.c(為了方便起見,可以進(jìn)入“home”,再進(jìn)入用戶目錄,在用戶目錄下新建udpserver.c)。 2、在udpserver.c中編寫服務(wù)器端程序代碼并保存。 3、在“終端”(“Applications”→“附件”→“終端”)中執(zhí)行命令進(jìn)入udpserver.c所在目錄。(pwd命令可以顯示當(dāng)前所在目錄;ls命令可以顯示當(dāng)前目錄下的文件和文件夾信息;cd..命令可以進(jìn)入上一級(jí)目錄;cd 目錄名 命令可以進(jìn)入當(dāng)前所示的某個(gè)目錄。) 4、執(zhí)行命令gcc –o udpserver udpserver.c生成可執(zhí)行文件udpserver。 5、執(zhí)行命令./ udpserver,觀察結(jié)果。 6、認(rèn)真分析源代碼,體會(huì)如何編寫一個(gè)UDP服務(wù)器端程序。 六、參考程序(udpserver.c)
- #include<stdio.h>
- #include<string.h>
- #include<unistd.h>
- #include<sys/types.h>
- #include<sys/socket.h>
- #include<stdlib.h>
- #include<netinet/in.h>
- #include<arpa/inet.h>
-
- #define PORT 1234
- #define MAXDATASIZE 100
-
- main()
- {
- int sockfd;
- struct sockaddr_in server;
- struct sockaddr_in client;
- socklen_t addrlen;
- int num;
- char buf[MAXDATASIZE];
-
- if((sockfd = socket(AF_INET, SOCK_DGRAM, 0)) == -1)
- {
- perror("Creatingsocket failed.");
- exit(1);
- }
-
- bzero(&server,sizeof(server));
- server.sin_family=AF_INET;
- server.sin_port=htons(PORT);
- server.sin_addr.s_addr= htonl (INADDR_ANY);
- if(bind(sockfd, (struct sockaddr *)&server, sizeof(server)) == -1)
- {
- perror("Bind()error.");
- exit(1);
- }
-
- addrlen=sizeof(client);
- while(1)
- {
- num =recvfrom(sockfd,buf,MAXDATASIZE,0,(struct sockaddr*)&client,&addrlen);
-
- if (num < 0)
- {
- perror("recvfrom() error\n");
- exit(1);
- }
-
- buf[num] = '\0';
- printf("You got a message (%s%) from client.\nIt's ip is%s, port is %d.\n",buf,inet_ntoa(client.sin_addr),htons(client.sin_port));
- sendto(sockfd,"Welcometo my server.\n",22,0,(struct sockaddr *)&client,addrlen);
- if(!strcmp(buf,"bye"))
- break;
- }
- close(sockfd);
- }
實(shí)驗(yàn)四 UDP客戶端程序設(shè)計(jì) 一、實(shí)驗(yàn)?zāi)康?/strong> 學(xué)習(xí)和掌握Linux下的UDP客戶端基本原理和基本編程方法。 二、實(shí)驗(yàn)平臺(tái) ubuntu-8.04操作系統(tǒng) 三、實(shí)驗(yàn)內(nèi)容 編寫Linux下UDP客戶端套接字程序,結(jié)合實(shí)驗(yàn)三的UDP服務(wù)器端程序,實(shí)現(xiàn)以下功能: 1、客戶根據(jù)用戶提供的IP地址將用戶從終端輸入的信息發(fā)送給服務(wù)器,然后等待服務(wù)器的回應(yīng)。 2、服務(wù)器接收客戶端發(fā)送的信息并顯示,同時(shí)顯示客戶的IP地址、端口號(hào),并向客戶端發(fā)送信息。如果服務(wù)器接收的客戶信息為“bye”,則退出循環(huán),并關(guān)閉套接字。 3、客戶接收、顯示服務(wù)器發(fā)回的信息,并關(guān)閉套接字。 四、實(shí)驗(yàn)原理 見實(shí)驗(yàn)三的實(shí)驗(yàn)原理部分。 五、實(shí)驗(yàn)步驟 1、登陸進(jìn)入ubuntu操作系統(tǒng),新建一個(gè)文件,命名為udpclient.c(為了方便起見,可以進(jìn)入“home”,再進(jìn)入用戶目錄,在用戶目錄下新建udpclient.c)。 2、在udpclient.c中編寫客戶端程序代碼并保存。將實(shí)驗(yàn)三完成的udpserver.c拷貝到與udpclient.c同一目錄下。 3、在“終端”(“Applications”→“附件”→“終端”)中執(zhí)行命令進(jìn)入udpserver.c和udpclient.c所在目錄。 4、執(zhí)行命令gcc –o udpserver udpserver.c生成可執(zhí)行文件udpserver。 5、執(zhí)行命令./ udpserver。 6、再開一個(gè)“終端”,進(jìn)入udpserver.c和udpclient.c所在目錄,執(zhí)行命令 gcc–o udpclient udpclient.c生成可執(zhí)行文件udpclient。 7、執(zhí)行命令./ udpclient 127.0.0.1 hello。 8、觀察兩個(gè)“終端”出現(xiàn)的結(jié)果。 9、在客戶端終端下執(zhí)行命令./ udpclient 127.0.0.1 bye。 10、觀察兩個(gè)“終端”出現(xiàn)的結(jié)果。 11、認(rèn)真分析源代碼,體會(huì)如何編寫一個(gè)UDP客戶端程序。 六、參考程序(udpclient.c) - #include <stdio.h>
- #include <stdlib.h>
- #include <unistd.h>
- #include <string.h>
- #include <sys/types.h>
- #include <sys/socket.h>
- #include <netinet/in.h>
- #include <netdb.h>
-
- #define PORT 1234
- #define MAXDATASIZE 100
-
- int main(int argc, char *argv[])
- {
- int sockfd, num;
- char buf[MAXDATASIZE];
-
- struct hostent *he;
- struct sockaddr_in server,peer;
-
- if (argc !=3)
- {
- printf("Usage: %s <IP Address><message>\n",argv[0]);
- exit(1);
- }
-
- if ((he=gethostbyname(argv[1]))==NULL)
- {
- printf("gethostbyname()error\n");
- exit(1);
- }
-
- if ((sockfd=socket(AF_INET, SOCK_DGRAM,0))==-1)
- {
- printf("socket() error\n");
- exit(1);
- }
-
- bzero(&server,sizeof(server));
- server.sin_family = AF_INET;
- server.sin_port = htons(PORT);
- server.sin_addr= *((struct in_addr *)he->h_addr);
- sendto(sockfd, argv[2],strlen(argv[2]),0,(struct sockaddr *)&server,sizeof(server));
- socklen_t addrlen;
- addrlen=sizeof(server);
- while (1)
- {
- if((num=recvfrom(sockfd,buf,MAXDATASIZE,0,(struct sockaddr *)&peer,&addrlen))== -1)
- {
- printf("recvfrom() error\n");
- exit(1);
- }
- if (addrlen != sizeof(server) ||memcmp((const void *)&server, (const void *)&peer,addrlen) != 0)
- {
- printf("Receive message from otherserver.\n");
- continue;
- }
-
- buf[num]='\0';
- printf("Server Message:%s\n",buf);
- break;
- }
-
- close(sockfd);
- }
UDP實(shí)驗(yàn)結(jié)果: 服務(wù)器端: 
客戶端: 
一、實(shí)驗(yàn)?zāi)康?/strong> 理解名字與IP地址的轉(zhuǎn)換函數(shù),實(shí)現(xiàn)主機(jī)名與IP地址之間的轉(zhuǎn)換。學(xué)習(xí)和掌握Linux下的gethostbyname()和gethostbyaddr()函數(shù)基本原理和基本編程方法。 二、實(shí)驗(yàn)平臺(tái) ubuntu-8.04操作系統(tǒng) 三、實(shí)驗(yàn)內(nèi)容 1、利用gethostbyname()函數(shù)編程實(shí)現(xiàn)名字解析,將主機(jī)名轉(zhuǎn)換成相應(yīng)IP地址。 2、利用gethostbyaddr()函數(shù)編程實(shí)現(xiàn)反向地址解析,將IP地址轉(zhuǎn)換成主機(jī)名,查詢指定IP地址對(duì)應(yīng)的主機(jī)域名地址。 四、實(shí)驗(yàn)原理 現(xiàn)在的網(wǎng)絡(luò)都是使用名字來訪問服務(wù)器的,而不是使用IP地址來訪問。那它們是怎么轉(zhuǎn)換的呢?答案就是利用名字與IP地址的轉(zhuǎn)換函數(shù)實(shí)現(xiàn)的:gethostbyname和gethostbyaddr在主機(jī)名字與IP地址間進(jìn)行轉(zhuǎn)換。 1、gethostbyname()函數(shù) 找主機(jī)名最基本的函數(shù)gethostbyname(),該函數(shù)執(zhí)行如果成功,它返回一個(gè)指向結(jié)構(gòu)hostent的指針,該結(jié)構(gòu)中包含了該主機(jī)的所有IPv4地址或IPv6地址;如果失敗返回空指針。下面是定義: -------------------------------------------------------------------
# include <netdb.h> struct hostent * gethostbyname (const char *hostname); ------------------------------------------------------------------- |
參數(shù)hostname是主機(jī)的域名地址,函數(shù)將查詢的結(jié)果作為參數(shù)返回。如果失敗返回空指針;如果成功此參數(shù)返回的非空指針指向如下的hostent結(jié)構(gòu): -------------------------------------------------------------------
struct hostent { char * h_name; /*主機(jī)的正式名稱*/ char * * h_aliases; /*主機(jī)的別名列表*/ int h_addrtype; /*主機(jī)地址類型*/ int h_length; /*主機(jī)地址長(zhǎng)度*/ char * * h_addr_list; *主機(jī)IP地址的列表*/ }; # define h_addr h_addr_list[0] /*在列表中的第一個(gè)地址*/ ------------------------------------------------------------------- | |
2、gethostbyaddr()函數(shù) gethostbyaddr()函數(shù)的作用是可以查詢指定的IP地址對(duì)應(yīng)的主機(jī)域名地址。函數(shù)的形式如下: -------------------------------------------------------------------
# include <netdb.h> struct hostent * gethostbyaddr (const char *addr, size_t len, int family); ------------------------------------------------------------------- |
返回:若為非空指針,則表示成功;若為空指針,則表示出錯(cuò),同時(shí)設(shè)置h_errno。該函數(shù)同樣返回一個(gè)指向結(jié)構(gòu)hostent的指針。而在參數(shù)中,參數(shù)addr不是char *類型,而是一個(gè)真正指向含有IPv4或IPv6地址的結(jié)構(gòu)in_addr或in6_addr的指針;len是此結(jié)構(gòu)的大小,對(duì)于IPv4地址為4,對(duì)于IPv6地址為16;參數(shù)family為AF_INET或AF_INET6。 五、實(shí)驗(yàn)步驟 1、登陸進(jìn)入ubuntu操作系統(tǒng),新建一個(gè)文件,命名為gethostbyname.c,新建另一個(gè)文件,命名為gethostbyaddr.c。 2、在gethostbyname.c和gethostbyaddr.c中編寫相應(yīng)代碼并保存。 3、在“終端”(“Applications”→“附件”→“終端”)中執(zhí)行命令進(jìn)入gethostbyname.c和gethostbyaddr.c所在目錄。(pwd命令可以顯示當(dāng)前所在目錄;ls命令可以顯示當(dāng)前目錄下的文件和文件夾信息;cd..命令可以進(jìn)入上一級(jí)目錄;cd 目錄名 命令可以進(jìn)入當(dāng)前所示的某個(gè)目錄。) 4、執(zhí)行命令gcc –o gethostbyname gethostbyname.c生成可執(zhí)行文件gethostbyname。 5、執(zhí)行命令./gethostbyname host_name。(注意:此處host_name代表主機(jī)名,利用命令hostname可以查看本機(jī)的主機(jī)名) 6、觀察并分析程序運(yùn)行結(jié)果。 7、執(zhí)行命令gcc –o gethostbyaddr gethostbyaddr.c生成可執(zhí)行文件gethostbyaddr。 8、執(zhí)行命令./gethostbyname 127.0.0.1,觀察結(jié)果。 9、認(rèn)真分析源代碼,體會(huì)gethostbyname()和gethostbyaddr()函數(shù)的應(yīng)用。 六、參考程序 1、gethostbyname.c內(nèi)容如下: - #include <stdio.h>
- #include <stdlib.h>
- #include <string.h>
- #include <sys/types.h>
- #include <sys/socket.h>
- #include <netinet/in.h>
- #include <arpa/inet.h>
- #include <netdb.h>
-
- main(int argc, const char **argv)
- {
- ulong addr;
- struct hostent*hp;
- char **p;
- if (argc !=2) {
- (void)printf("usage: %s host_name\n", argv[0]);
- exit(1);
- }
- hp =gethostbyname(argv[1]);
- if (hp ==NULL) {
- (void)printf("host information for %s not found\n", argv[1]);
- exit(2);
- }
- for (p =hp->h_addr_list; *p != 0; p++) {
- structin_addr in;
- char**q;
- (void)memcpy(&in.s_addr, *p, sizeof(in.s_addr));
- (void)printf("%s\t%s", inet_ntoa(in), hp->h_name);
- for(q = hp->h_aliases; *q != 0; q++)
- (void) printf(" %s", *q);
- (void)putchar('\n');
- }
- exit (0);
- }
-
2、gethostbyaddr.c內(nèi)容如下: - #include <stdio.h>
- #include <stdlib.h>
- #include <string.h>
- #include <sys/types.h>
- #include <sys/socket.h>
- #include <netinet/in.h>
- #include <arpa/inet.h>
- #include <netdb.h>
-
- main(int argc, const char **argv)
- {
- ulong addr;
- structhostent *hp;
- char **p;
- if (argc !=2) {
- (void)printf("usage: %s IP-address\n", argv[0]);
- exit(1);
- }
- if((int)(addr = inet_addr(argv[1])) == -1) {
- (void)printf("IP-address must be of the form a.b.c.d\n");
- exit(2);
- }
- hp =gethostbyaddr((char *)&addr, sizeof (addr), AF_INET);
- if (hp ==NULL) {
- (void)printf("host information for %s not found\n", argv[1]);
- exit(3);
- }
- for (p =hp->h_addr_list; *p != 0; p++) {
- structin_addr in;
- char**q;
- (void)memcpy(&in.s_addr, *p, sizeof (in.s_addr));
- (void)printf("%s\t%s", inet_ntoa(in), hp->h_name);
- for(q = hp->h_aliases; *q != 0; q++)
- (void) printf(" %s", *q);
- (void)putchar('\n');
- }
- exit (0);
- }
-
摘要: 一、實(shí)驗(yàn)?zāi)康睦斫膺M(jìn)程的創(chuàng)建和終止方法;熟悉父進(jìn)程與子進(jìn)程對(duì)描述符的操作過程;學(xué)會(huì)編寫基本的多進(jìn)程并發(fā)服務(wù)器程序和客戶程序。二、實(shí)驗(yàn)平臺(tái)ubuntu-8.04操作系統(tǒng)三、實(shí)驗(yàn)內(nèi)容編寫多進(jìn)程并發(fā)服務(wù)器程序和客戶程序,具體功能如下:1、服務(wù)器等待接收客戶的連接請(qǐng)求,一旦連接成功則顯示客戶地址,接著接收客戶端的名稱并顯示;然后接收來自該客戶的字符串,每當(dāng)收到一個(gè)字符串時(shí),顯示該字符串,并將字符串按照愷撒密... 閱讀全文
一個(gè)seclect的封裝
uint32 SocketWait(TSocket *s,bool rd,bool wr,uint32 timems)
{
fd_set rfds,wfds;
#ifdef _WIN32
TIMEVAL tv;
#else
struct timeval tv;
#endif /* _WIN32 */
FD_ZERO(&rfds);
FD_ZERO(&wfds);
if (rd) //TRUE
FD_SET(*s,&rfds); //添加要測(cè)試的描述字
if (wr) //FALSE
FD_SET(*s,&wfds);
tv.tv_sec=timems/1000; //second
tv.tv_usec=timems%1000; //ms
for (;;) //如果errno==EINTR,反復(fù)測(cè)試緩沖區(qū)的可讀性
{
switch(select((*s)+1,&rfds,&wfds,NULL,
(timems==TIME_INFINITE?NULL:&tv))) //測(cè)試在規(guī)定的時(shí)間內(nèi)套接口接收緩沖區(qū)中是否有數(shù)據(jù)可讀
{ //0--超時(shí),-1--出錯(cuò)
case 0: /* time out */
return 0;
case (-1): /* socket error */
if (SocketError()==EINTR)
break;
return 0; //有錯(cuò)但不是EINTR
default:
if (FD_ISSET(*s,&rfds)) //如果s是fds中的一員返回非0,否則返回0
return 1;
if (FD_ISSET(*s,&wfds))
return 2;
return 0;
};
}
}
此命令用于為特定軟件包打補(bǔ)丁,他使用diff命令對(duì)源文件進(jìn)行操作。
基本命令語法:
patch [-R] {-p(n)} [--dry-run] < patch_file_name
p:為path的縮寫。
n:指將patch文件中的path第n條’/’及其左邊部分取消。
-R:卸載patch包。
--dry-run:嘗試patch軟件,并不真正修改軟件。
使用實(shí)例:
/home/sense/patch-2.6.19.1
=============================================================
diff --git a/arch/i386/kernel/acpi/boot.c b/arch/i386/kernel/acpi/boot.c
index d12fb97..c8f96cf 100644
--- a/arch/i386/kernel/acpi/boot.c
+++ b/arch/i386/kernel/acpi/boot.c
@@ -333,7 +333,7 @@ acpi_parse_ioapic(acpi_table_entry_heade
/*
* Parse Interrupt Source Override for the ACPI SCI
*/
-static void acpi_sci_ioapic_setup(u32 bus_irq, u32 gsi, u16 polarity, u16 trigger)
+static void acpi_sci_ioapic_setup(u32 gsi, u16 polarity, u16 trigger)
=============================================================
此patch文件的path=a/arch/i386/kernel/acpi
[sense@ssn src]$ pwd
/usr/src
[sense@ssn src]$ tree
.
`-- a
`-- arch
`-- i386
`-- kernel
`-- acpi
和a/同目錄時(shí):
[sense@ssn src]$ pwd
/usr/src
[sense@ssn src]$ patch -p0 < /home/sense/patch-2.6.19.1 安裝補(bǔ)丁
[sense@ssn src]$ patch -p0 -R < /home/sense/patch-2.6.19.1 卸載補(bǔ)丁
和a/arch/同目錄時(shí):
[sense@ssn src]$ pwd
/usr/src/a/
[sense@ssn src]$ patch -p1 < /home/sense/patch-2.6.19.1 安裝補(bǔ)丁
[sense@ssn src]$ patch -p1 -R < /home/sense/patch-2.6.19.1 卸載補(bǔ)丁
和a/arch/i386/同目錄時(shí):
[sense@ssn src]$ pwd
/usr/src/a/arch/
[sense@ssn src]$ patch -p2 < /home/sense/patch-2.6.19.1 安裝補(bǔ)丁
[sense@ssn src]$ patch -p2 -R < /home/sense/patch-2.6.19.1 卸載補(bǔ)丁
_command void testslickc()
{
say("testslickc");
int ii = pos("ab", "zzzab");
say(ii);
ii =pos("aa", "aazzzaa");
say(ii);
ii = pos("ba", "aazzza");
say(ii);
//ii 為 0 ;
ii = pos("Aa", "aazzza");
say(ii);
//"I" "忽略大小寫"
ii = pos("Aa", "aazzza", 1,"I");
say(ii);
//"I " "忽略大小寫" "&" "使用通配符"
//使用通配符和忽略大小寫
ii = pos("A*a", "aazzza", 1,"I&");
say(ii);
}
http://www.leetcode.com/2010/10/implement-strstr-to-find-substring-in.html
Rabin-Karp algorithm, KMP algorithm, and the Boyer-Moore algorithm
|