• <ins id="pjuwb"></ins>
    <blockquote id="pjuwb"><pre id="pjuwb"></pre></blockquote>
    <noscript id="pjuwb"></noscript>
          <sup id="pjuwb"><pre id="pjuwb"></pre></sup>
            <dd id="pjuwb"></dd>
            <abbr id="pjuwb"></abbr>

            colorful

            zc qq:1337220912


            u盤centos64位

            http://wenku.baidu.com/view/e63438745acfa1c7aa00cc83.html

            posted @ 2013-07-15 07:14 多彩人生 閱讀(263) | 評論 (0)編輯 收藏

            Postgresql 學習

            要看
            http://www.cnblogs.com/stephen-liu74/archive/2012/05/30/2306493.html

            http://www.cnblogs.com/ringofthec/archive/2010/11/14/hehe.html

            http://jingyan.baidu.com/article/6766299717faec54d41b8477.html

            http://www.cnblogs.com/hyddd/archive/2010/04/08/1706863.html  // vim學習

            posted @ 2013-07-14 16:49 多彩人生 閱讀(245) | 評論 (0)編輯 收藏

            Postgresql跨數據庫查詢

            postgres 跨數據庫查詢

            dblink 的安裝
               linux
                  #cd postgres源碼安裝目錄/contrib/dblink
                  # make
                  # make install
                  注意: 如果你在安裝了postgres后執行了 make clean, make distclean, 那你可能需要重新 ./configure make make install 一下
               windows
                  windows 默認是安裝的

            dblink模塊加載
               PostgreSQL 有很多外部模塊可以加載,例如 dblink, pg_buffercache 等,在 9.1 版本
               以前,只要對應的 postgresql-contrib 已經安裝,只需要將對應的 sql 文件導入到目標庫
               即可,例如,要在 數據庫 skytf 里安裝 dblink 模塊,只需要執行以下操作就行;

               cd $PGHOME/share/contrib
               psql -d skytf -U postgresql -f dblink.sql
               導入成功之后,那么 dblink 模塊即加載成功。
               
               注意!!
               在 9.1 版本以后,模塊加載環節 PostgreSQL 提供命令 "CREATE EXTENSION" 來替代以上操作。  
               通過執行 CREATE EXTENSION dblink來加載 dblink

            dblink 使用:
               關于dblink, dblink_connect, dblink_disconnect 請參考手冊
               http://www.postgresql.org/docs/9.1/static/dblink.html
               例1
               select dblink_connect('連接名','host=192.168.1.27  port=1921 dbname=testdb user=test_user password=test_user' );
               host, port, user等 可以跟據情況省略掉

               例2
               select * from tb1 inner join dblink('dbname=db2', 'select id from tb2 where id=\'20120623\'') as acc(id int) on tb1.id = acc.id order by tb1.id;

            參考網站:
            http://blog.sina.com.cn/s/blog_538d55be01010clc.html
            http://francs3.blog.163.com/blog/static/4057672720108401139868/
            http://www.postgresql.org/docs/9.1/static/dblink.html
            http://zhenghaoju700.blog.163.com/blog/static/135859518201251382628663/

            posted @ 2013-07-14 16:46 多彩人生 閱讀(1381) | 評論 (0)編輯 收藏

            open 與fopen

            http://www.360doc.com/content/11/0901/14/2338020_144987612.shtml

            posted @ 2013-07-13 22:48 多彩人生 閱讀(215) | 評論 (0)編輯 收藏

            Linux top 命令詳解

            http://blog.csdn.net/sunboy_2050/article/details/6129177

            查看多核CPU命令

             mpstat -P ALL  和  sar -P ALL 


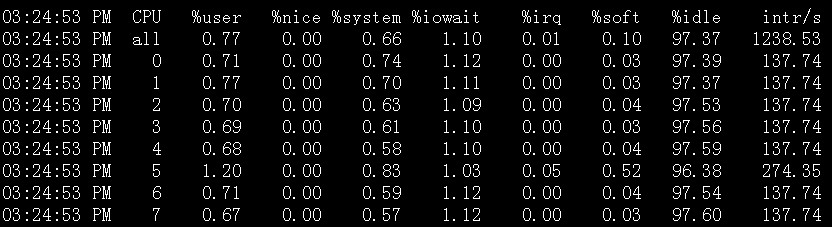
            說明:sar -P ALL > aaa.txt   重定向輸出內容到文件 aaa.txt


            top命令經常用來監控linux的系統狀況,比如cpu、內存的使用,程序員基本都知道這個命令,但比較奇怪的是能用好它的人卻很少,例如top監控視圖中內存數值的含義就有不少的曲解。

            本文通過一個運行中的WEB服務器的top監控截圖,講述top視圖中的各種數據的含義,還包括視圖中各進程(任務)的字段的排序。


            top進入視圖

            top視圖 01

            top視圖 01

            【top視圖 01】是剛進入top的基本視圖,我們來結合這個視圖講解各個數據的含義。

            第一行:
            10:01:23 — 當前系統時間
            126 days, 14:29 — 系統已經運行了126天14小時29分鐘(在這期間沒有重啟過)
            2 users — 當前有2個用戶登錄系統
            load average: 1.15, 1.42, 1.44 — load average后面的三個數分別是1分鐘、5分鐘、15分鐘的負載情況。

            load average數據是每隔5秒鐘檢查一次活躍的進程數,然后按特定算法計算出的數值。如果這個數除以邏輯CPU的數量,結果高于5的時候就表明系統在超負荷運轉了。

            第二行:
            Tasks — 任務(進程),系統現在共有183個進程,其中處于運行中的有1個,182個在休眠(sleep),stoped狀態的有0個,zombie狀態(僵尸)的有0個。

            第三行:cpu狀態
            6.7% us — 用戶空間占用CPU的百分比。
            0.4% sy — 內核空間占用CPU的百分比。
            0.0% ni — 改變過優先級的進程占用CPU的百分比
            92.9% id — 空閑CPU百分比
            0.0% wa — IO等待占用CPU的百分比
            0.0% hi — 硬中斷(Hardware IRQ)占用CPU的百分比
            0.0% si — 軟中斷(Software Interrupts)占用CPU的百分比

            在這里CPU的使用比率和windows概念不同,如果你不理解用戶空間和內核空間,需要充充電了。

            第四行:內存狀態
            8306544k total — 物理內存總量(8GB)
            7775876k used — 使用中的內存總量(7.7GB)
            530668k free — 空閑內存總量(530M)
            79236k buffers — 緩存的內存量 (79M)

            第五行:swap交換分區
            2031608k total — 交換區總量(2GB)
            2556k used — 使用的交換區總量(2.5M)
            2029052k free — 空閑交換區總量(2GB)
            4231276k cached — 緩沖的交換區總量(4GB)

            這里要說明的是不能用windows的內存概念理解這些數據,如果按windows的方式此臺服務器“危矣”:8G的內存總量只剩下530M的可用內存。Linux的內存管理有其特殊性,復雜點需要一本書來說明,這里只是簡單說點和我們傳統概念(windows)的不同。

            第 四行中使用中的內存總量(used)指的是現在系統內核控制的內存數,空閑內存總量(free)是內核還未納入其管控范圍的數量。納入內核管理的內存不見 得都在使用中,還包括過去使用過的現在可以被重復利用的內存,內核并不把這些可被重新使用的內存交還到free中去,因此在linux上free內存會越 來越少,但不用為此擔心。

            如果出于習慣去計算可用內存數,這里有個近似的計算公式:第四行的free + 第四行的buffers + 第五行的cached,按這個公式此臺服務器的可用內存:530668+79236+4231276 = 4.7GB。

            對于內存監控,在top里我們要時刻監控第五行swap交換分區的used,如果這個數值在不斷的變化,說明內核在不斷進行內存和swap的數據交換,這是真正的內存不夠用了。

            第六行是空行

            第七行以下:各進程(任務)的狀態監控
            PID — 進程id
            USER — 進程所有者
            PR — 進程優先級
            NI — nice值。負值表示高優先級,正值表示低優先級
            VIRT — 進程使用的虛擬內存總量,單位kb。VIRT=SWAP+RES
            RES — 進程使用的、未被換出的物理內存大小,單位kb。RES=CODE+DATA
            SHR — 共享內存大小,單位kb
            S — 進程狀態。D=不可中斷的睡眠狀態 R=運行 S=睡眠 T=跟蹤/停止 Z=僵尸進程
            %CPU — 上次更新到現在的CPU時間占用百分比
            %MEM — 進程使用的物理內存百分比
            TIME+ — 進程使用的CPU時間總計,單位1/100秒
            COMMAND — 進程名稱(命令名/命令行)

            多U多核CPU監控

            在top基本視圖中,按鍵盤數字“1”,可監控每個邏輯CPU的狀況:

            top視圖 02

            top視圖 02

            觀察上圖,服務器有16個邏輯CPU,實際上是4個物理CPU。

            進程字段排序

            默 認進入top時,各進程是按照CPU的占用量來排序的,在【top視圖 01】中進程ID為14210的java進程排在第一(cpu占用100%),進程ID為14183的java進程排在第二(cpu占用12%)。可通過 鍵盤指令來改變排序字段,比如想監控哪個進程占用MEM最多,我一般的使用方法如下:

            1. 敲擊鍵盤“b”(打開/關閉加亮效果),top的視圖變化如下:

            top視圖 03

            top視圖 03

            我們發現進程id為10704的“top”進程被加亮了,top進程就是視圖第二行顯示的唯一的運行態(runing)的那個進程,可以通過敲擊“y”鍵關閉或打開運行態進程的加亮效果。

            2. 敲擊鍵盤“x”(打開/關閉排序列的加亮效果),top的視圖變化如下:

            top視圖 04

            top視圖 04

            可以看到,top默認的排序列是“%CPU”。

            3. 通過”shift + >”或”shift + <”可以向右或左改變排序列,下圖是按一次”shift + >”的效果圖:

            top視圖 05

            top視圖 05

            視圖現在已經按照%MEM來排序了。

            改變進程顯示字段

            1. 敲擊“f”鍵,top進入另一個視圖,在這里可以編排基本視圖中的顯示字段:

            top視圖 06

            top視圖 06

            這里列出了所有可在top基本視圖中顯示的進程字段,有”*”并且標注為大寫字母的字段是可顯示的,沒有”*”并且是小寫字母的字段是不顯示的。如果要在基本視圖中顯示“CODE”和“DATA”兩個字段,可以通過敲擊“r”和“s”鍵:

            top視圖 07

            top視圖 07

            2. “回車”返回基本視圖,可以看到多了“CODE”和“DATA”兩個字段:

            top視圖 08

            top視圖 08

            top命令的補充

            top 命令是Linux上進行系統監控的首選命令,但有時候卻達不到我們的要求,比如當前這臺服務器,top監控有很大的局限性。這臺服務器運行著 websphere集群,有兩個節點服務,就是【top視圖 01】中的老大、老二兩個java進程,top命令的監控最小單位是進程,所以看不到我關心的java線程數和客戶連接數,而這兩個指標是java的 web服務非常重要的指標,通常我用ps和netstate兩個命令來補充top的不足。

            監控java線程數:
            ps -eLf | grep java | wc -l

            監控網絡客戶連接數:
            netstat -n | grep tcp | grep 偵聽端口 | wc -l

            上面兩個命令,可改動grep的參數,來達到更細致的監控要求。

            在 Linux系統“一切都是文件”的思想貫徹指導下,所有進程的運行狀態都可以用文件來獲取。系統根目錄/proc中,每一個數字子目錄的名字都是運行中的 進程的PID,進入任一個進程目錄,可通過其中文件或目錄來觀察進程的各項運行指標,例如task目錄就是用來描述進程中線程的,因此也可以通過下面的方 法獲取某進程中運行中的線程數量(PID指的是進程ID):

            ls /proc/PID/task | wc -l

            在linux中還有一個命令pmap,來輸出進程內存的狀況,可以用來分析線程堆棧:

            pmap PID

            posted @ 2013-07-13 11:30 多彩人生 閱讀(392) | 評論 (0)編輯 收藏

            ERROR:invalid byte sequence for encoding"UTF8

            http://blog.sina.com.cn/s/blog_680f6fa70100ldrg.html
                 

            原因是沒有正確設置客戶端字符集。

                  默認情況下,PostgreSQL是不轉換字符集的,如果你的數據庫是UTF8的字符集,一般終端的中文字符集會設置為GBK,或en_US(查看終端的 字符集可以看LANG環境變量的設置),所以你輸入的中文是GBK的編碼,這個編碼不經轉換的存入數據庫中,而數據庫是UTF8的,PostgreSQL 一看沒有這樣的UTF8編碼,所以當然報錯了。
            解決方法】:
            方法一:設置postgresql的客戶端編碼為GBK,這時PostgreSQL就知道輸入的內容是GBK編碼的,這樣PostgreSQL數據庫會自動做字符集的轉換,把其轉換成UTF8編碼。
            方法二:直接設置終端的字符集編碼為UTF8,讓輸入的編碼直接為UTF8,而不是GBK。
             
            具體演示】:
             設置postgresql的客戶端編碼:
            設置psql客戶端字符集為GBK,方法有兩種,一種是在psql中輸入“\encoding GBK” ,另一種是設置環境變量“export PGCLIENTENCODING=GBK”,演示如下:
            #psql -d dsc
            dsc=# insert into t values(1,'中國');
            ERROR:  invalid byte sequence for encoding "UTF8": 0xd6d0
            HINT:  This error can also happen if the byte sequence does not match the encoding expected by the server, which is controlled by "client_encoding".
            dsc=# show client_encoding;
             client_encoding
            -----------------
             UTF8
            (1 row)
            dsc=# \encoding GBK 
            dsc=# show client_encoding;
             client_encoding
            -----------------
             GBK
            (1 row)
            dsc=# insert into t values(1,'中國');
            INSERT 0 1
            dsc=# commit;
            WARNING:  there is no transaction in progress
            COMMIT
            dsc=# select * from t;
             id | name
            ----+------
              1 | 中國
            (1 row)

            [postgres@dsc ~]$ export PGCLIENTENCODING=GBK
            [postgres@dsc ~]$ psql
            psql: FATAL:  conversion between GBK and LATIN1 is not supported
            [postgres@dsc ~]$ psql -d dsc
            psql (8.4.3)
            Type "help" for help.
            dsc=# select * from t;
             id | name
            ----+------
              1 | 中國
            (1 row)
            dsc=# insert into t values(2,'我的中國');
            INSERT 0 1
            dsc=# select * from t;                  
             id |   name  
            ----+----------
              1 | 中國
              2 | 我的中國
            (2 rows)

            posted @ 2013-07-12 14:00 多彩人生 閱讀(758) | 評論 (0)編輯 收藏

            安裝postgresql 出現readline錯誤

            http://blog.csdn.net/shutfuckingup/article/details/8532752

            1 環境信息
            OS: CentOS release 5.2(Final)
            PG: postgresql-9.0.0]

            2 根據提示,我測試了下 configre命令,果然報這個錯
            [root@HK81-107postgresql-9.0.0]# ./configure
            checking build system type... i686-pc-linux-gnu
            checking host system type... i686-pc-linux-gnu
            checking which template to use... linux
            checking whether to build with 64-bit integer date/time support...yes
            checking whether NLS is wanted... no
            checking for default port number... 5432
            checking for block size... 8kB
            checking for segment size... 1GB
            checking for WAL block size... 8kB
            checking for WAL segment size... 16MB
            checking for gcc... gcc
            checking for C compiler default output file name... a.out
            checking whether the C compiler works... yes
            checking whether we are cross compiling... no
            checking for suffix of executables... 
            checking for suffix of object files... o
            checking whether we are using the GNU C compiler... yes
            checking whether gcc accepts -g... yes
            checking for gcc option to accept ISO C89... none needed
            checking if gcc supports -Wdeclaration-after-statement...yes
            checking if gcc supports -Wendif-labels... yes
            checking if gcc supports -fno-strict-aliasing... yes
            checking if gcc supports -fwrapv... yes
            checking whether the C compiler still works... yes
            checking how to run the C preprocessor... gcc -E
            checking allow thread-safe client libraries... yes
            checking whether to build with Tcl... no
            checking whether to build Perl modules... no
            checking whether to build Python modules... no
            checking whether to build with GSSAPI support... no
            checking whether to build with Kerberos 5 support... no
            checking whether to build with PAM support... no
            checking whether to build with LDAP support... no
            checking whether to build with Bonjour support... no
            checking whether to build with OpenSSL support... no
            checking for grep that handles long lines and -e.../bin/grep
            checking for egrep... /bin/grep -E
            checking for ld used by GCC... /usr/bin/ld
            checking if the linker (/usr/bin/ld) is GNU ld... yes
            checking for ranlib... ranlib
            checking for strip... strip
            checking whether it is possible to strip libraries... yes
            checking for ar... ar
            checking for tar... /bin/tar
            checking whether ln -s works... yes
            checking for gawk... gawk
            checking for a thread-safe mkdir -p... /bin/mkdir -p
            checking for bison... no
            configure: WARNING:
            *** Without Bison you will not be able to build PostgreSQL from CVSnor
            *** change any of the parser definition files. You can obtain Bison from
            *** a GNU mirror site.  (If you are using theofficial distribution of
            *** PostgreSQL then you do not need to worry about this, becausethe Bison
            *** output is pre-generated.)
            checking for flex... no
            configure: WARNING:
            *** Without Flex you will not be able to build PostgreSQL from CVSnor
            *** change any of the scanner definition files. You can obtain Flex from
            *** a GNU mirror site.  (If you are using theofficial distribution of
            *** PostgreSQL then you do not need to worry about this because theFlex
            *** output is pre-generated.)
            checking for perl... /usr/bin/perl
            configure: using perl 5.8.8
            checking for main in -lm... yes
            checking for library containing setproctitle... no
            checking for library containing dlopen... -ldl
            checking for library containing socket... none required
            checking for library containing shl_load... no
            checking for library containing getopt_long... nonerequired
            checking for library containing crypt... -lcrypt
            checking for library containing fdatasync... nonerequired
            checking for library containing gethostbyname_r... nonerequired
            checking for library containing shmget... none required
            checking for -lreadline... no
            checking for -ledit... no
            configure: error: readline library notfound
            If you have readline already installed, see config.log for detailson the
            failure.  It is possible the compiler isnt lookingin the proper directory.
            Use --without-readline to disable readlinesupport.

                根據提示,應該是沒有安裝 readline包。

            3 檢查系統是否安裝 readline 包
            [root@HK81-107postgresql-9.0.0]# rpm -qa | grep readline
            readline-5.1-3.el5

               說明系統已經安裝了 readline包。

            4 通過 yum 搜索相關的readline 包
            [root@HK81-107postgresql-9.0.0]# yum search readline
            lftp.i386 : A sophisticated file transfer program
            lftp.i386 : A sophisticated file transfer program
            php-readline.i386 : Standard PHP module provides readline librarysupport
            lftp.i386 : A sophisticated file transfer program
            readline.i386 : A library for editing typed commandlines.
            compat-readline43.i386 : The readline 4.3 library for compatibilitywith older software.
            readline-devel.i386 : Files needed to develop programs which usethe readline library.
            readline.i386 : A library for editing typed command lines.

             根據提示,有一個包引起了我的注意 "readline-devel",猜想可能與這個包有關。
             
            5 安裝 readline-devel 包
            [root@HK81-107postgresql-9.0.0]# yum -y install -y readline-devel
            Setting up Install Process
            Parsing package install arguments
            Resolving Dependencies
            --> Running transaction check
            ---> Package readline-devel.i386 0:5.1-3.el5 set tobe updated
            --> Processing Dependency: libtermcap-devel forpackage: readline-devel
            --> Running transaction check
            ---> Package libtermcap-devel.i386 0:2.0.8-46.1 setto be updated
            --> Finished Dependency Resolution

            Dependencies Resolved

            =============================================================================
             Package                Arch      Version         Repository       Size 
            =============================================================================
            Installing:
             readline-devel         i386      5.1-3.el5       base             146 k
            Installing for dependencies:
             libtermcap-devel       i386      2.0.8-46.1      base              56 k

            Transaction Summary
            =============================================================================
            Install     2Package(s)         
            Update      0Package(s)         
            Remove      0Package(s)        

            Total download size: 201 k
            Downloading Packages:
            (1/2): libtermcap-devel-2 100%|=========================|  56kB   00:00     
            (2/2): readline-devel-5.1 100% |=========================| 146kB   00:00     
            Running rpm_check_debug
            Running Transaction Test
            Finished Transaction Test
            Transaction Test Succeeded
            Running Transaction
              Installing:libtermcap-devel            ######################### [1/2] 
              Installing:readline-devel              ######################### [2/2]

            Installed: readline-devel.i386 0:5.1-3.el5
            Dependency Installed: libtermcap-devel.i386 0:2.0.8-46.1
            Complete!

            6 再次執行 configure 成功。

            7 關于 readline 的解釋,來自官網
            --without-readline
            Prevents use of the Readline library (and libedit as well). Thisoption disables command-line 
            editing and  history in psql, so it is notrecommended.

               說明: 根據步驟2 執行 configure時報錯提示,可以加上 "--without-readline" 從而避開這個ERROR,
            但Postgresql官方不推薦這么做,所以還是安裝吧。

            posted @ 2013-07-11 20:58 多彩人生 閱讀(3718) | 評論 (0)編輯 收藏

            centos 6.2 apache安裝

            Apache2的是作為一個CentOS的軟件包,因此我們可以直接用下面命令安裝它:

                yum install httpd

              現在配置系統在引導時啟動Apache

                chkconfig --levels 235 httpd on

              并啟動Apache

                /etc/init.d/httpd start

              現在,您的瀏覽器到http://192.168.0.100,你應該看到Apache2的測試頁:

              Apache的默認文檔根目錄是在CentOS上的/var/www/html 目錄 ,配置文件是/etc/httpd/conf/httpd.conf。配置存儲在的/etc/httpd/conf.d/目錄。

            posted @ 2013-07-11 19:03 多彩人生 閱讀(288) | 評論 (0)編輯 收藏

            linux查看目錄大小


            可以使用:
            [tuest@demoserver ~]$ du --max-depth 1 /tmp  -h
            4.0K    /tmp/.X11-unix
            4.0K    /tmp/.ICE-unix
            4.0K    /tmp/.font-unix
            5.9M    /tmp


            就可以看到目錄下所有文件夾的內容大小

            如果只想看一個目錄的大小可以使用:
            [tuest@demoserver ~]$ du /tmp -sh
            5.9M    /tmp

            posted @ 2013-07-11 18:48 多彩人生 閱讀(307) | 評論 (0)編輯 收藏

            Linux 中如何卸載已安裝的軟件.

            Linux 中如何卸載已安裝的軟件.
              Linux軟件的安裝和卸載一直是困擾許多新用戶的難題。在 Windows中,我們可以使用軟件自帶的安裝卸載程序或在控制面板中的“添加/刪除程序”來實現。與其相類似,在Linux下有一個功能強大的軟件安裝 卸載工具,名為RPM。它可以用來建立、安裝、查詢、更新、卸載軟件。該工具是在命令行下使用的。在Shell的提示符后輸入rpm,就可獲得該命令的幫 助信息。

              軟件的安裝

              Linux下軟件的安裝主要有兩種不同的形式。第一種安裝文件名為xxx.tar.gz;另一種安裝文件名為xxx.i386.rpm。以第一種方式發行的軟件多為以源碼形式發送的;第二種方式則是直接以二進制形式發送的。

              對于第一種,安裝方法如下:

              1 .首先,將安裝文件拷貝至你的目錄中。例如,如果你是以root身份登錄上的,就將軟件拷貝至/root中。

              #cp xxx.tar.gz /root

              2 .由于該文件是被壓縮并打包的,應對其解壓縮。命令為:

              #tar xvzf filename.tar.gz 如果是filename.tar.bz2格式的,應該是tar jxvf filename.tar.bz2來解壓

              3. 執行該命令后,安裝文件按路徑,解壓縮在當前目錄下。用ls命令可以看到解壓縮后的文件。通常在解壓縮后產生的文件中,有“Install”的文件。該文件為純文本文件,詳細講述了該軟件包的安裝方法。

              4.執行解壓縮后產生的一個名為configure的可執行腳本程序。它是用于檢查系統是否有編譯時所需的庫,以及庫的版本是否滿足編譯的需要等安裝所需要的系統信息。為隨后的編譯工作做準備。命令為: #./configure

              如果您想把軟件安裝到指定目錄,應該用#./configure --prefix=/您自己指定的目錄,比如我想把一個mlterm安裝到/opt/mlterm目錄中,應該如下輸入

              #./configure --prefix=/opt/mlterm

              5.檢查通過后,將生成用于編譯的MakeFile文件。此時,可以開始進行編譯了。編譯的過程視軟件的規模和計算機性能的不同,所耗費的時間也不同。命令為: #make。

              6.成功編譯后,鍵入如下的命令開始安裝:

              #make install

              7.安裝完畢,應清除編譯過程中產生的臨時文件和配置過程中產生的文件。鍵入如下命令:

              #make clean

              #make distclean

              至此,軟件的安裝結束。

              對于第二種,其安裝方法要簡單得多。

              同第一種方式一樣,將安裝文件拷貝至你的目錄中。然后使用rpm來安裝該文件。命令如下:

              #rpm -i filename.i386.rpm

              rpm將自動將安裝文件解包,并將軟件安裝到缺省的目錄下。并將軟件的安裝信息注冊到rpm的數據庫中。參數i的作用是使rpm進入安裝模式。

              軟件的卸載

              1.軟件的卸載主要是使用rpm來進行的。卸載軟件首先要知道軟件包在系統中注冊的名稱。鍵入命令:

              #rpm -q -a

              即可查詢到當前系統中安裝的所有的軟件包。

              2. 確定了要卸載的軟件的名稱,就可以開始實際卸載該軟件了。鍵入命令:

              #rpm -e [package name]

              即可卸載軟件。參數e的作用是使rpm進入卸載模式。對名為[package name]的軟件包進行卸載。由于系統中各個軟件包之間相互有依賴關系。如果因存在依賴關系而不能卸載,rpm將給予提示并停止卸載。你可以使用如下的命令來忽略依賴關系,直接開始卸載:

              #rpm -e [package name] -nodeps

              忽略依賴關系的卸載可能會導致系統中其它的一些軟件無法使用

              如果想知道rpm包安裝到哪里了呢?

              應該用 #rpm -ql [package name]

              3.如何卸載用源碼包安裝的軟件?

              最好是看README和INSTALL ;一般的情況下都有說,但大多軟件沒有提供源碼包的卸載方法;我們可以找到軟件的安裝點刪除。主要看你把它安裝在哪了。

              比如:

              如果安裝軟件時,指定個目錄。這個問題也不會難;

              比如用源碼包安裝gaim 的

              #./configure --prefix=/opt/gaim

              #make

              #make install

              如果安裝mlterm

              #./configure --prefix=/opt/mlterm

              #make

              #make install

              把源碼包安裝的軟件,都指定安裝在 /opt目錄中,這樣不就知道了;

              如果刪除,就刪除相應的軟件目錄;

              有些軟件要在解壓安裝目錄中執行 make uninstall ,這樣就卸載掉了。

            posted @ 2013-07-11 18:43 多彩人生 閱讀(449) | 評論 (0)編輯 收藏

            僅列出標題
            共25頁: First 4 5 6 7 8 9 10 11 12 Last 

            導航

            統計

            常用鏈接

            留言簿(3)

            隨筆分類

            隨筆檔案

            搜索

            最新評論

            閱讀排行榜

            評論排行榜

            午夜视频久久久久一区| 国产成人精品免费久久久久| 99久久免费国产精品热| 久久婷婷五月综合97色直播| 伊人伊成久久人综合网777| 久久99精品久久久久久秒播| 国产精品女同一区二区久久| 免费国产99久久久香蕉| 91麻豆精品国产91久久久久久| 久久r热这里有精品视频| 91久久精品视频| 久久国产精品免费| 亚洲人成网站999久久久综合| 四虎影视久久久免费| 久久精品国产清自在天天线| 中文精品久久久久人妻不卡| 亚洲中文久久精品无码| A狠狠久久蜜臀婷色中文网| 国产三级观看久久| 亚洲国产精品无码久久久久久曰| 亚洲精品成人久久久| 色综合久久中文字幕无码| 东京热TOKYO综合久久精品| 亚洲狠狠久久综合一区77777 | 久久久精品人妻一区二区三区蜜桃| 一本大道久久香蕉成人网| 99久久国产精品免费一区二区| 中文字幕人妻色偷偷久久| 人人狠狠综合久久亚洲88| 久久亚洲精品无码播放| 无码人妻久久一区二区三区| 国产高潮久久免费观看| 久久久久久久波多野结衣高潮 | 久久天天躁狠狠躁夜夜躁2O2O| 久久久精品免费国产四虎| 久久久午夜精品福利内容| 久久国产精品无码一区二区三区| 久久综合久久伊人| 久久亚洲精品中文字幕三区| 亚洲AV无码久久精品色欲| 久久久久久av无码免费看大片|